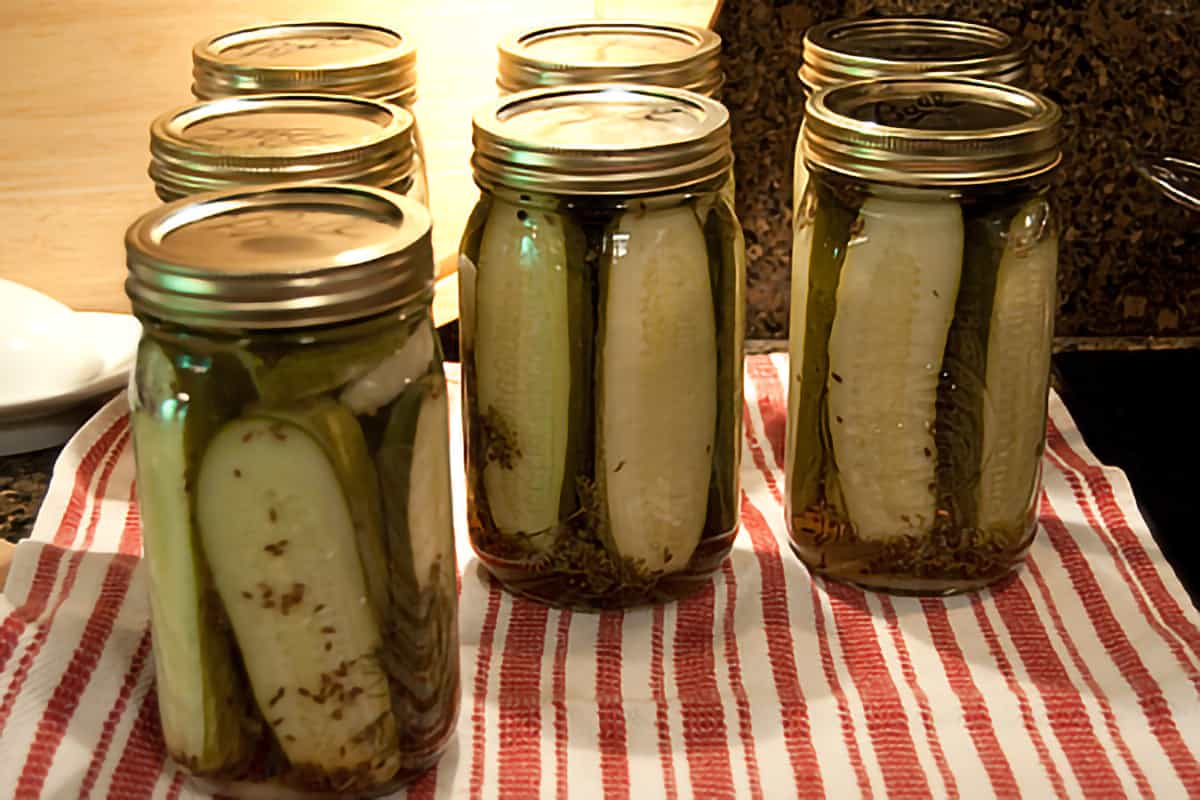
These are our family’s Favorite Kosher Dill Pickles, homemade with fresh cucumbers, dill, and garlic. It’s a tested and approved safe canning recipe for shelf stable storage.
I’ve been “puttin’ up” again, y’all! This time, it’s our favorite kosher dill pickle recipe. And when I say favorite, I really mean these are a favorite.
My daughter and grandson almost beg for these pickles every year. As a matter of fact, my old recipe notes say that the summer before our grandson was born, I put up 30 quarts of these dills. By the time he arrived in September, more than half of them were gone.
I have lots of pickling and preserving recipes like my Pickled Okra, Basic Salsa, and Home Canned Tomatoes. Some I make only occasionally, but these Kosher Dills are a must for every summer!
Recipe Snapshot: Favorite Kosher Dill Pickles
Prep Time: 45 minutes
Cook Time: 10 minutes
Processing Time: 30 minutes
Total Time: 1 hour, 25 minutes
Servings: Makes 7 quarts (70 servings)
Cuisine: American
Cooking Method: Stovetop Waterbath Canning
Primary Ingredients: Pickling cucumbers, pickling salt, 5% acidity white vinegar, dill, peppercorns, garlic
Skill Level: Intermediate
DO MORE WITH CHATGPT
WHAT PEOPLE ARE SAYING …
⭐⭐⭐⭐⭐
“Love love love this recipe!!! Super easy to make and these pickles are by far the best ones I’ve ever had… even better than my mom’s!“
— Peter Dutter
“I made these pickles this summer, and they are perfect. No better pickle out there. Thanks so much for this recipe.“
— Mary Branham
Use Proper Canning Procedures
Before I get started with the recipe, I want to take a minute to mention the importance of using proper canning procedures. If you haven’t canned before, or if it’s been a while since your last canning session, please review the process and get all your equipment ready before you start.
One of the best resources for new and seasoned canners alike is the Ball Blue Book. It’s published by the people who make the Ball canning jars. It’s available in lots of locations and on the web at amazon.com.
Some Other Good Online Resources
- National Center for Home Food Preservation (University of Georgia)
- Home Food Preservation Site (Pennsylvania State University)
The National Center for Home Food Preservation even offers a free online course in food preservation. It’s well worth the time for the amount of information you get!
Now, let’s get started making Kosher Dill Pickles!
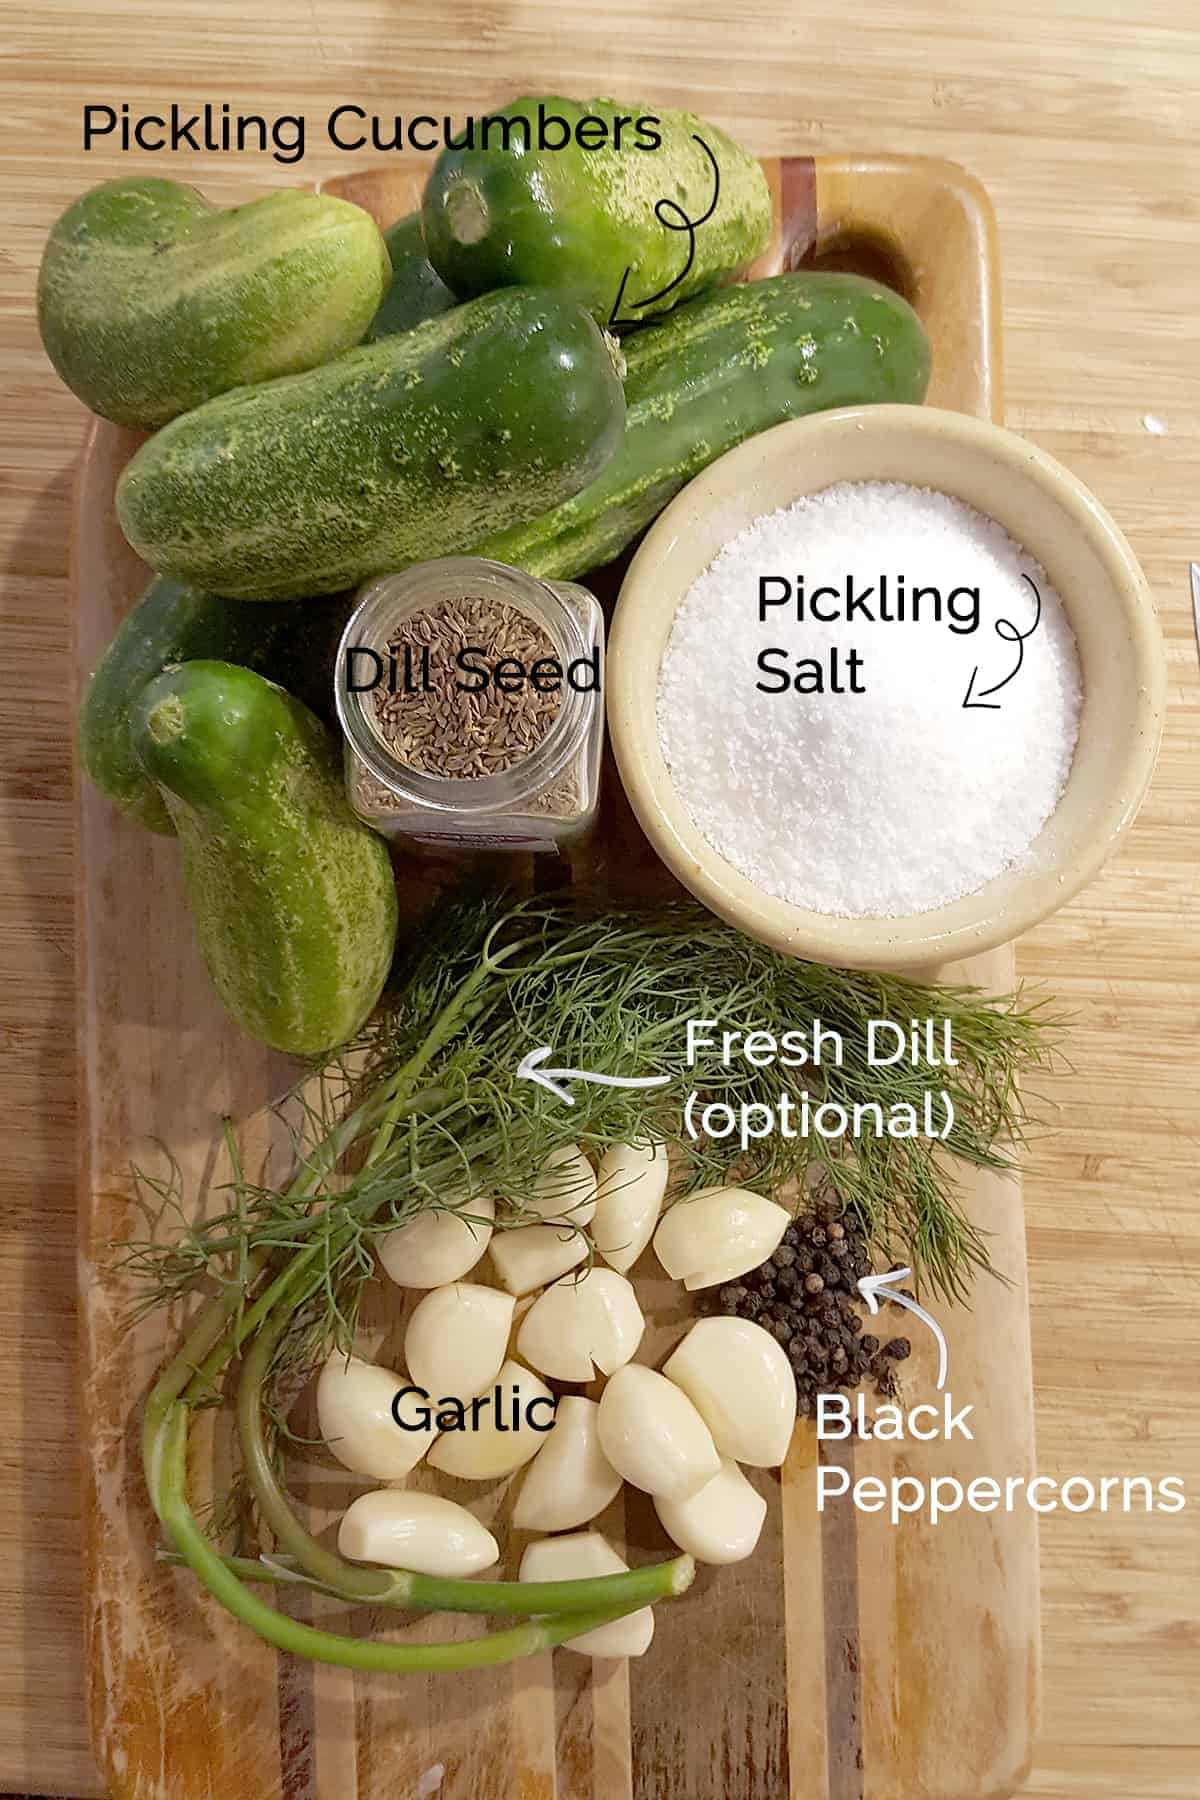
Ingredient Notes
This post may contain affiliate links. Lana’s Cooking is reader-supported and earns a tiny commission at no extra cost to you when you shop from our links.
For each quart jar of pickles, you’ll need:
— approximately 5 pickling (or Kirby) cucumbers
— one tablespoon of pickling salt
— one tablespoon of dill seed (or 3 heads of fresh dill)
— a sprig or two of fresh dill fronds (optional)
— five black peppercorns
— two nice fat garlic cloves.
When purchasing your produce, keep in mind that a full boiling water canner will hold seven quart or pint jars. So, if you want to make a full canner load of pickles, be sure to purchase enough produce for seven jars. IN MY OVER 25 YEARS OF EXPERIENCE MAKING THIS RECIPE, it typically takes about 6 pounds of 4- to 5-inch pickling cucumbers to yield 7 quart jars. Of course, I purchase a handful extra “just in case.”
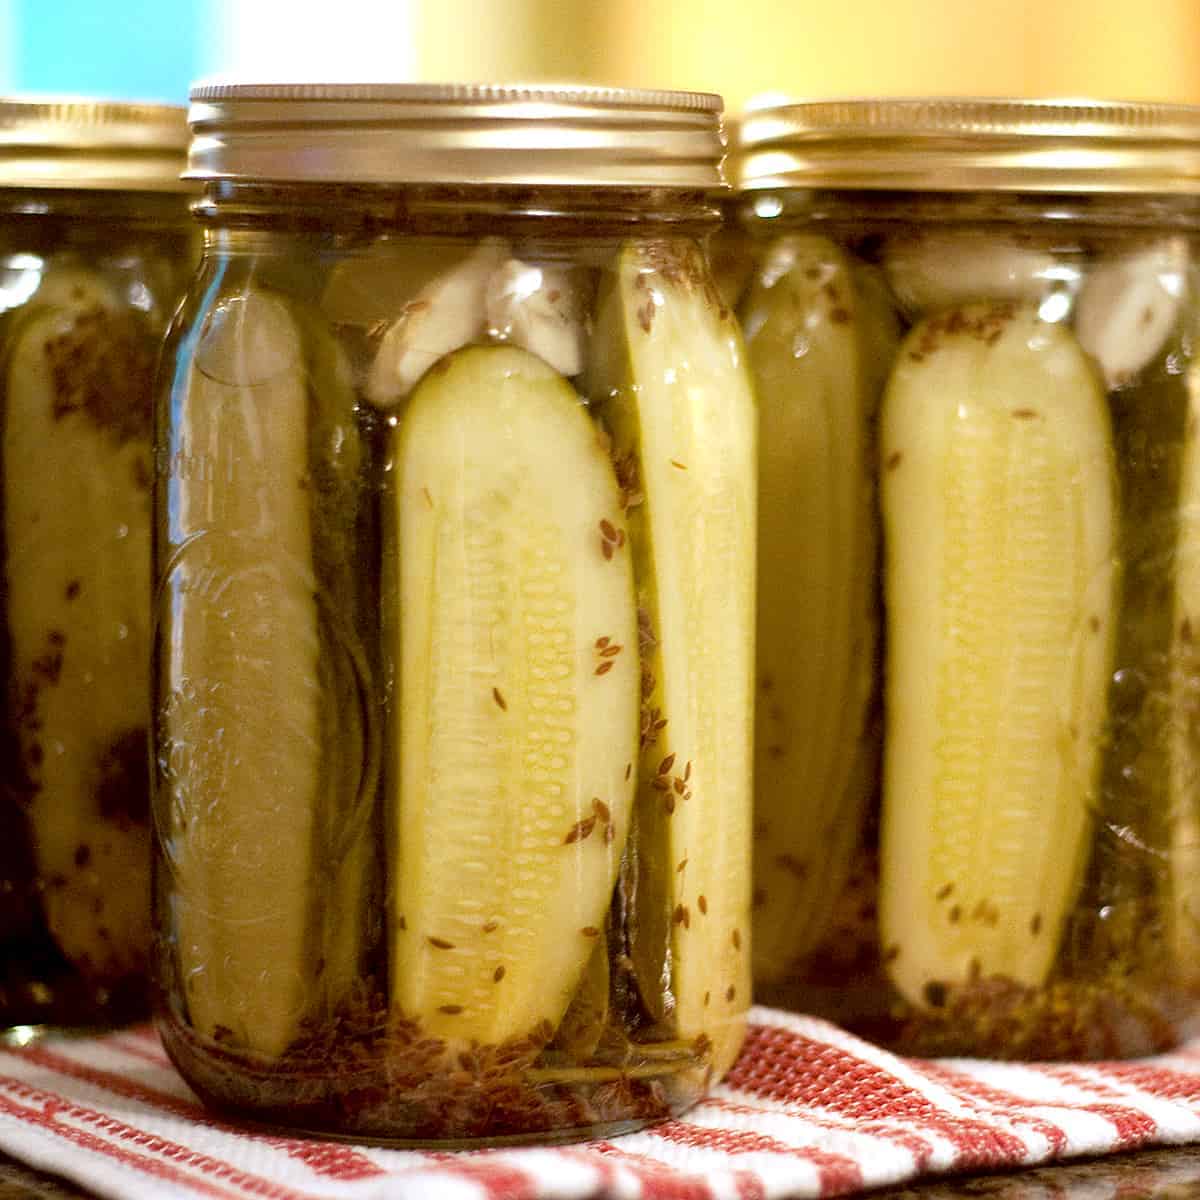
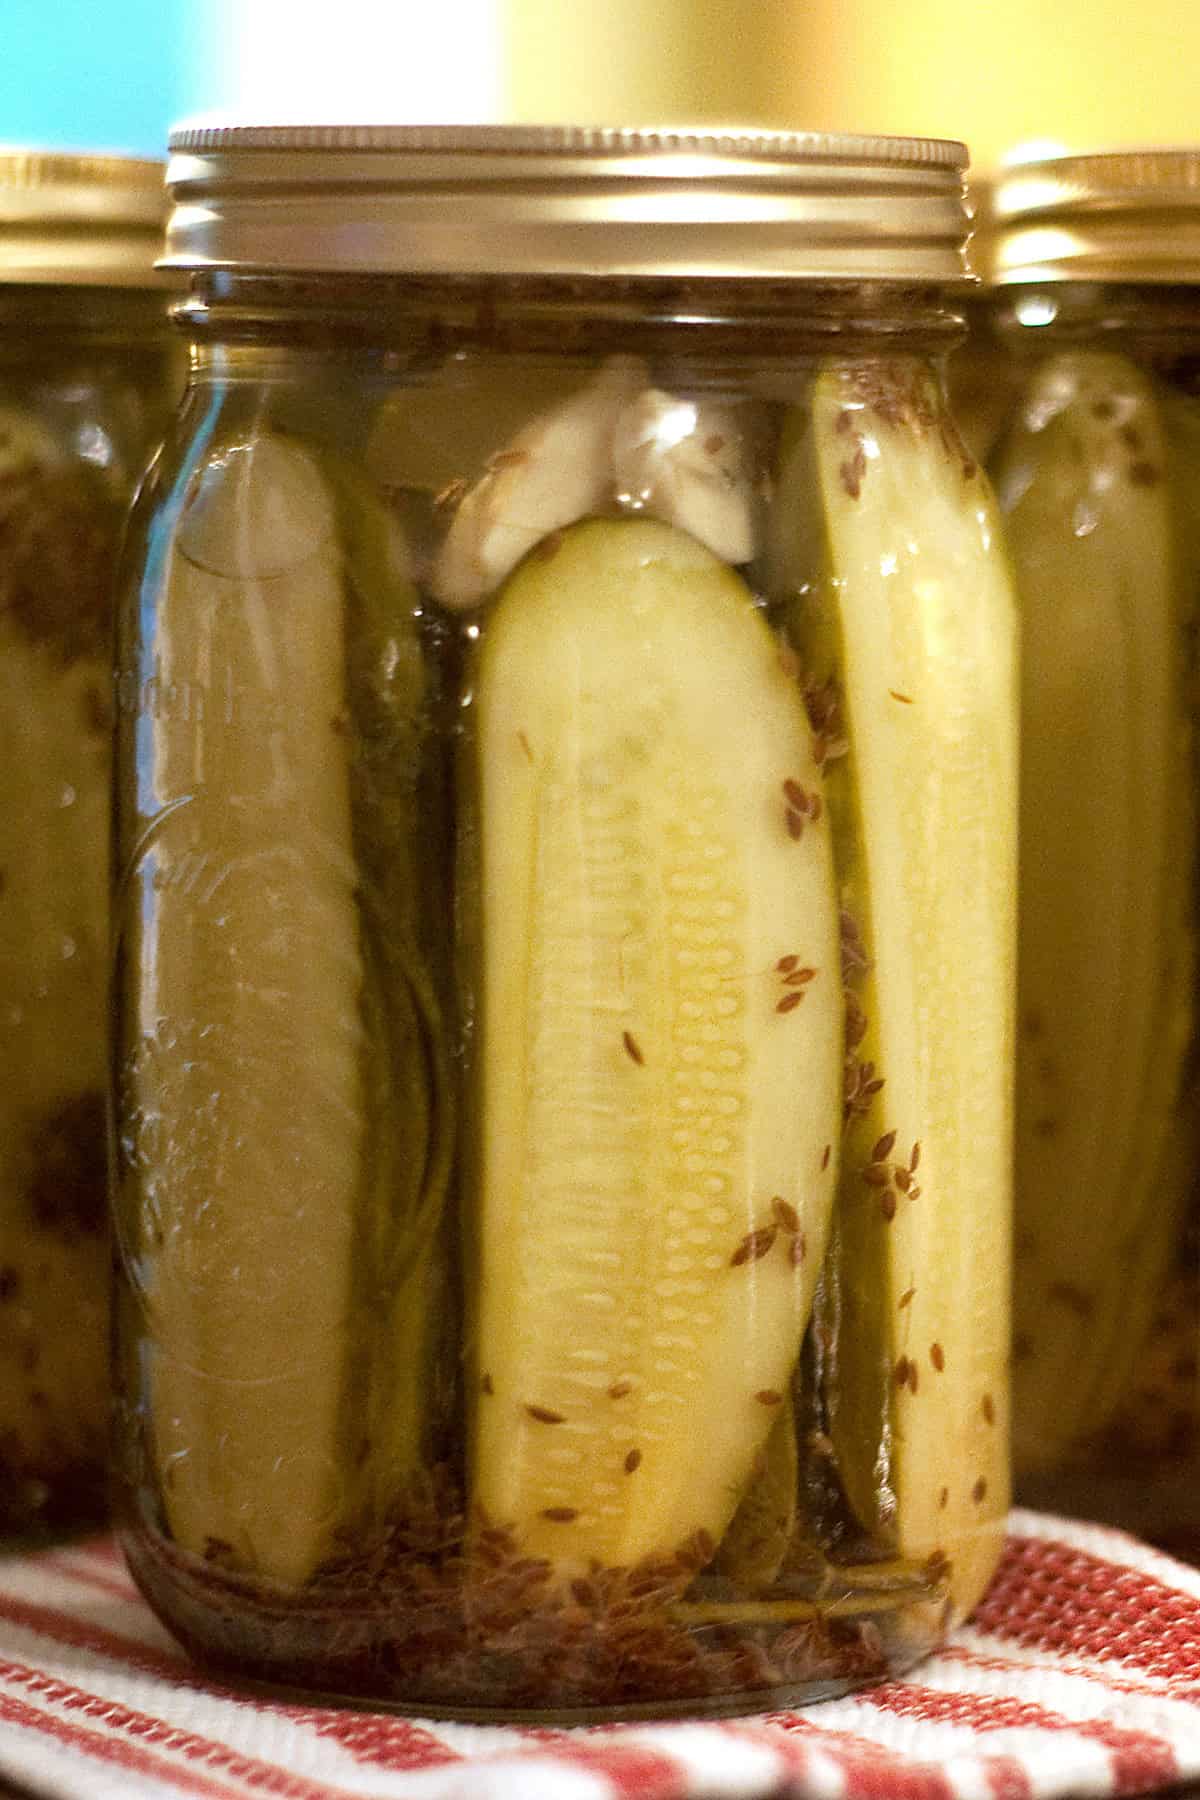
I tend to use wide-mouth quart jars for kosher dills because they fit the cucumbers best. Pickling (or Kirby) cucumbers are typically no more than 6 inches in length and will fit easily into quart jars.
Pickling (or Kirby) Cucumbers
For making pickles, you will need to find pickling cucumbers, sometimes called salad cucumbers or “Kirby” cucumbers. You absolutely don’t want waxed cucumbers or English cucumbers for your pickling recipe.
Although “Kirby” is a specific variety of cucumber, these days any pickling cucumber tends to be referred to as a Kirby cucumber. They’re the shorter, plumper, sort of stubby looking cucumbers with a prickly surface. I’ve seen these called salad cucumbers in some produce sections but technically they’re simply pickling cucumbers.
The cucumbers can be left whole or cut into halves or quarters. I typically cut mine into halves unless they’re really large, in which case I’ll quarter them. It doesn’t really matter, so do whatever suits you best.
Dill Seed or Fresh Dill Heads
Dill seed is easier to acquire than fresh dill heads. It’s available in practically every grocery store and from online spice and herb sellers. Some years, I have a good crop of dill, so I have fresh dill heads available, but I can’t always depend on that. The availability of dill seed is very predictable.
If you happen to have fresh dill heads and want to use them, they work really well in the recipe. You’d use three fresh dill heads in place of each tablespoon of dill seed (1 fresh dill head = 1 teaspoon of dill seed).
The fresh dill fronds are optional. I usually place a sprig or two in each jar merely for appearances. They’re pretty in there!
Pickling Salt
Yes, you really do need a special kind of salt for pickling. Pickling salt is widely available and easy to find. It doesn’t have any anti-caking or anti-clumping agents in it so it’s very pure. The additives in other salts can turn your pickles dark or make the liquid cloudy. It’s possible to use other salts, but amounts would have to be adjusted to accommodate for the differently sized salt granules. Better to just stick with canning salt.
Garlic and Black Peppercorns
Make sure that the garlic you use is fresh and free from blemishes. The peppercorns should be fresh and nicely fragrant.
Vinegar
Although I didn’t include it in the ingredients photo above, vinegar is a very important part of the pickling process. It’s the ingredient that gives pickles their distinctive tart taste and, most importantly, the ingredient that prevents botulism from forming in pickled foods.
Most pickle recipes call for distilled white vinegar, and that’s what I use. I’ve been asked whether other types of vinegar can be used, and the answer is yes. As long as the vinegar is at least 5% acidity. You’ll need to check the label of the vinegar to confirm that it is indeed 5% acidity as several companies have recently started diluting the vinegar to 4% and that won’t work!
Just keep in mind that substituting with other types of vinegar can change the taste and color of your pickles. They may have a more mellow taste and will also be darker in color.
Vinegar such as wine vinegar, salad vinegar, or homemade vinegar should not be used unless you can verify that it has an acetic value of at least 5%.
The complete ingredient list with detailed measurements is included in the printable recipe card at the bottom of this post.
The Canning Process for Kosher Dill Pickles
Start by Heating a Canner Filled with Water
- The first thing I do when I start a canning session is to fill my canner with water and start it heating on the stove. It takes quite a long time to heat that much water, so I get a start on it first thing in the process. Check the canner periodically while you work to make sure the water stays at a steady simmer.
Want to save this?
Prepare the Jars, Lids, and Rings
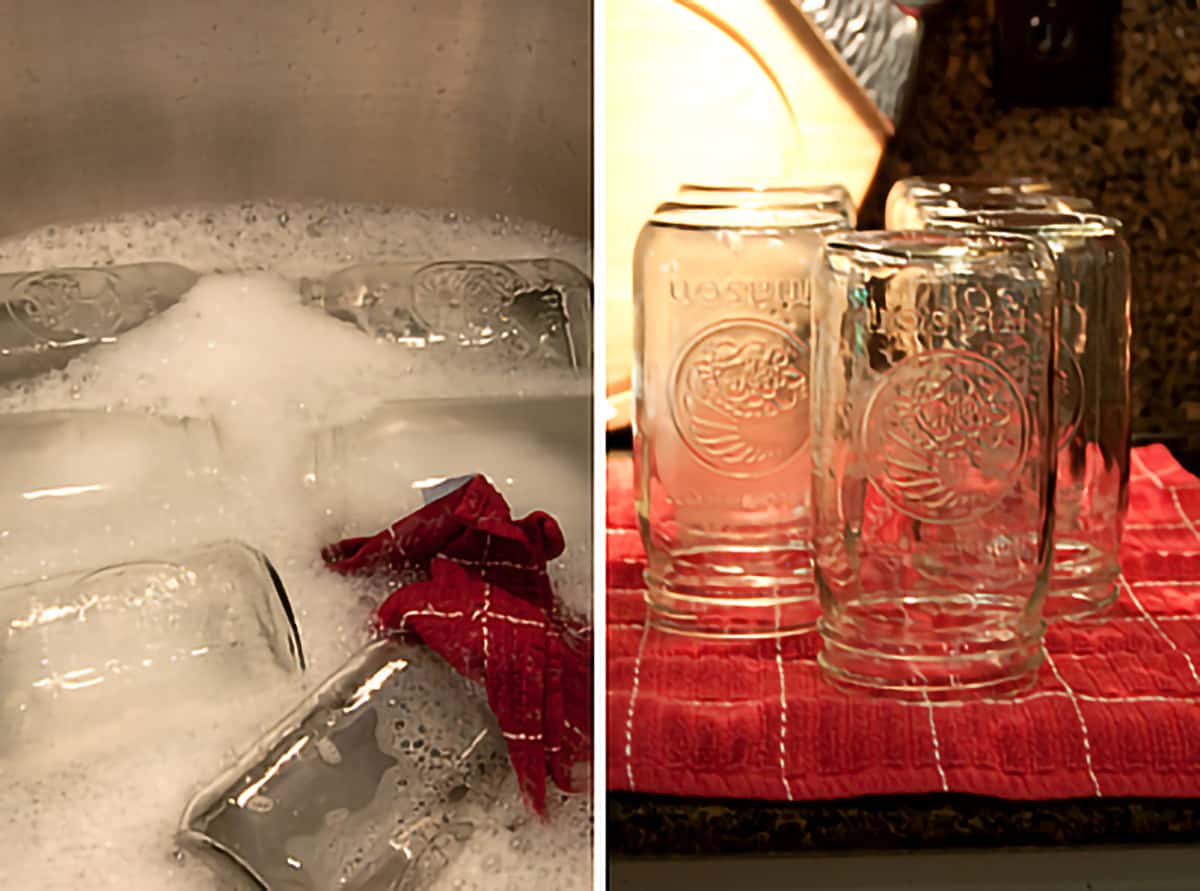
- My second step is to wash the jars in hot, soapy water. Rinse them well, making sure all traces of soap are removed. Drain on a clean kitchen towel. After washing, the jars still need to be sterilized before filling them. See the paragraph below for my procedure.
👉 PRO TIP: I put the clean jars in the canner and let them heat up along with the water. Some people hold them in a 200-degree oven. However, canning jars are not designed nor tempered for dry heat.
You need the jars to be hot when you’re ready to fill them because putting hot food in a cold jar can cause breakage. Likewise, putting a cold jar of food into boiling water is just asking for broken jars and all your hard work to end up in the bottom of the canner.
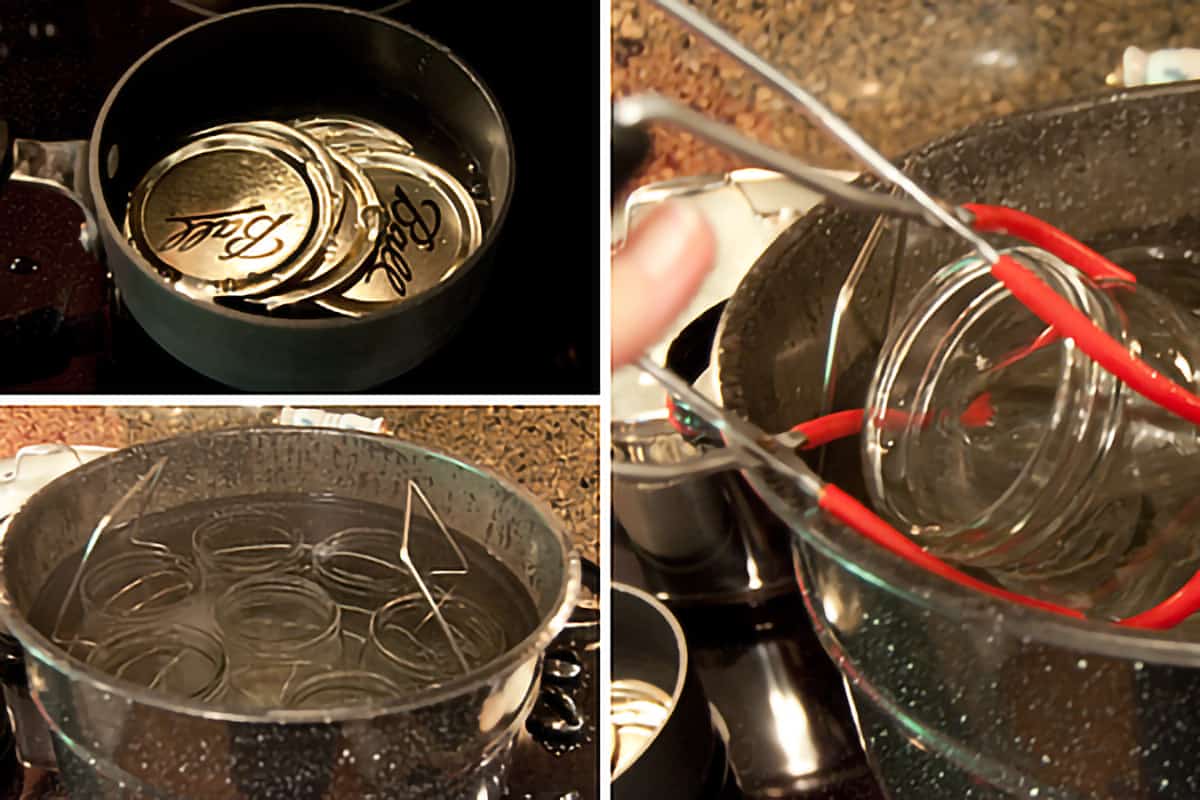
- Put the lids in a small pan with enough water to cover them. Set the pan on the stove with the lowest heat possible just to keep them warm until they’re needed. Set the rings aside. IMPORTANT: Check the package instructions on the lids you’re using. Most modern lids have a newer type of sealing compound that does not require them to be heated in simmering water.
⚠️ USE CAUTION! Remember you’re working with lots of boiling water when canning. Always use a jar lifter to remove jars from the hot water to prevent scalding.
Prepare the Produce

- Peel and halve the garlic. If you’re using fresh dill heads, trim them and set them aside with the garlic.
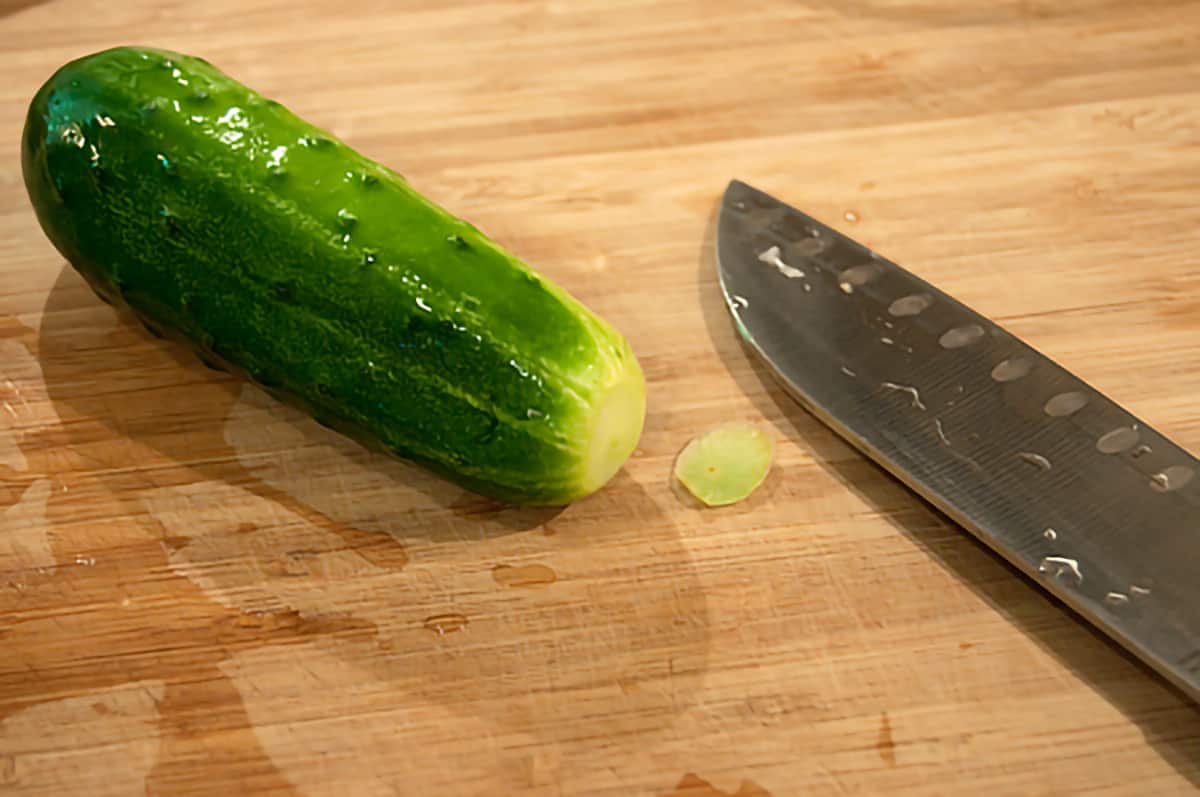
- Prepare the cucumbers by washing them and removing 1/16 inch from the blossom end of each. Cut into halves or quarters as you wish.
Pro Tip
Why remove that tiny sliver from the end of the cucumbers? It’s because there’s an enzyme that remains in the blossom end of cucumbers, which can cause your pickles to become soft while in storage.
Make the Brine
- For each quart jar of pickles, measure 1 cup water and 1 cup vinegar into a saucepan. Bring the water and vinegar to the boil. While the brine is coming to the boil, fill the jars (see next section).
Fill the Jars
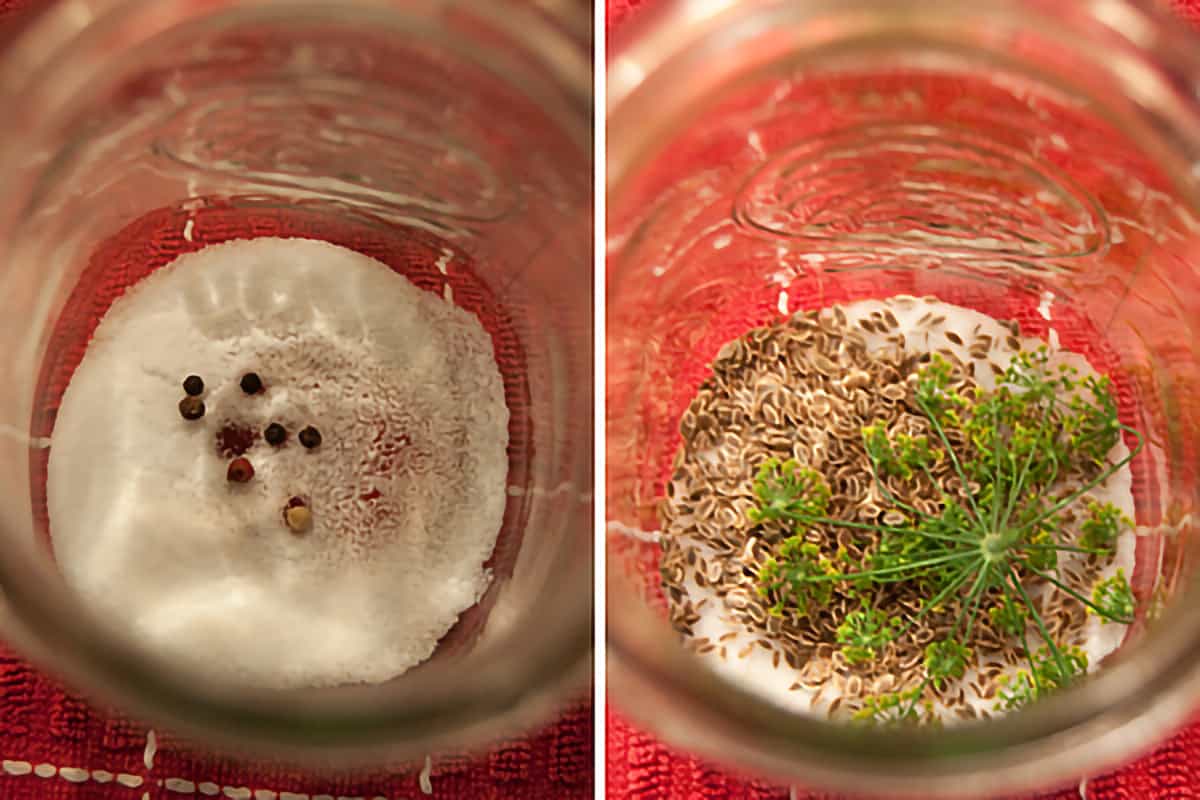
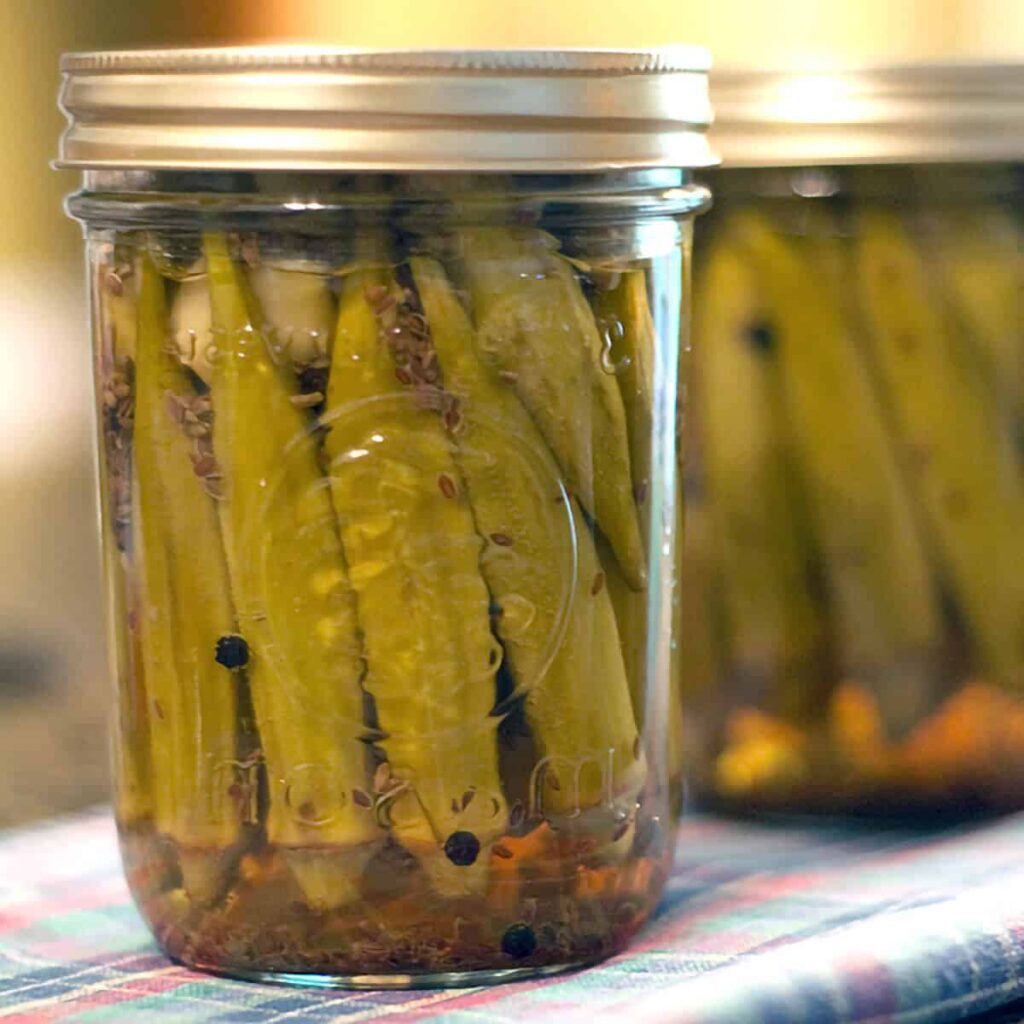
- In each quart jar, place 1 tablespoon salt, 1 tablespoon dill seed (or 3 heads fresh dill), 6 black peppercorns, and 2 halved garlic cloves.
Pro Tip
As noted earlier, each dill head counts as a teaspoon of dill seed. Since I only had a few dill heads this time, I used one head of dill and two teaspoons of seeds in each jar.
Add Cucumbers and Hot Brine to Jars
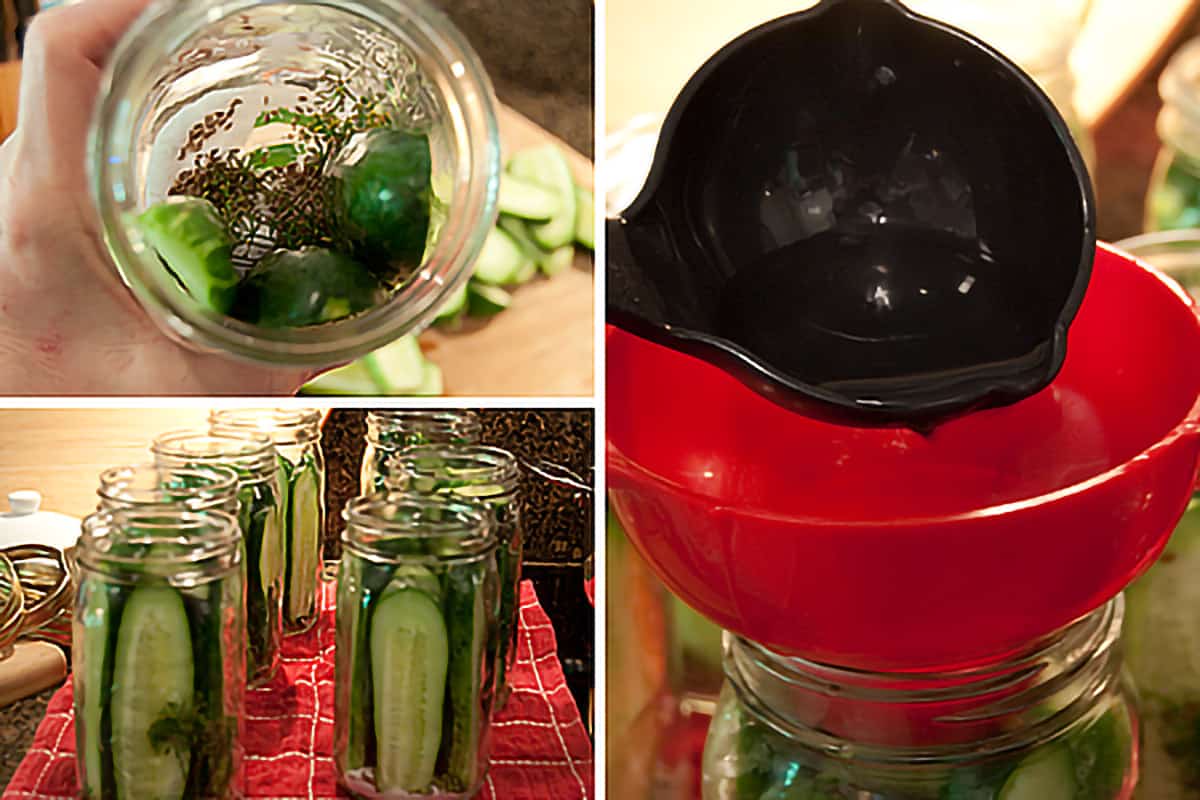
- Working with one jar at a time, pack the halved or quartered cucumbers into the hot jars.
- Using a canning funnel, pour the boiling vinegar and water solution over the jar contents, leaving 1/2 inch of headspace.
What is Headspace?
When a canning recipe refers to headspace, it simply means the amount of space between the top of the liquid and the top edge of the jar.
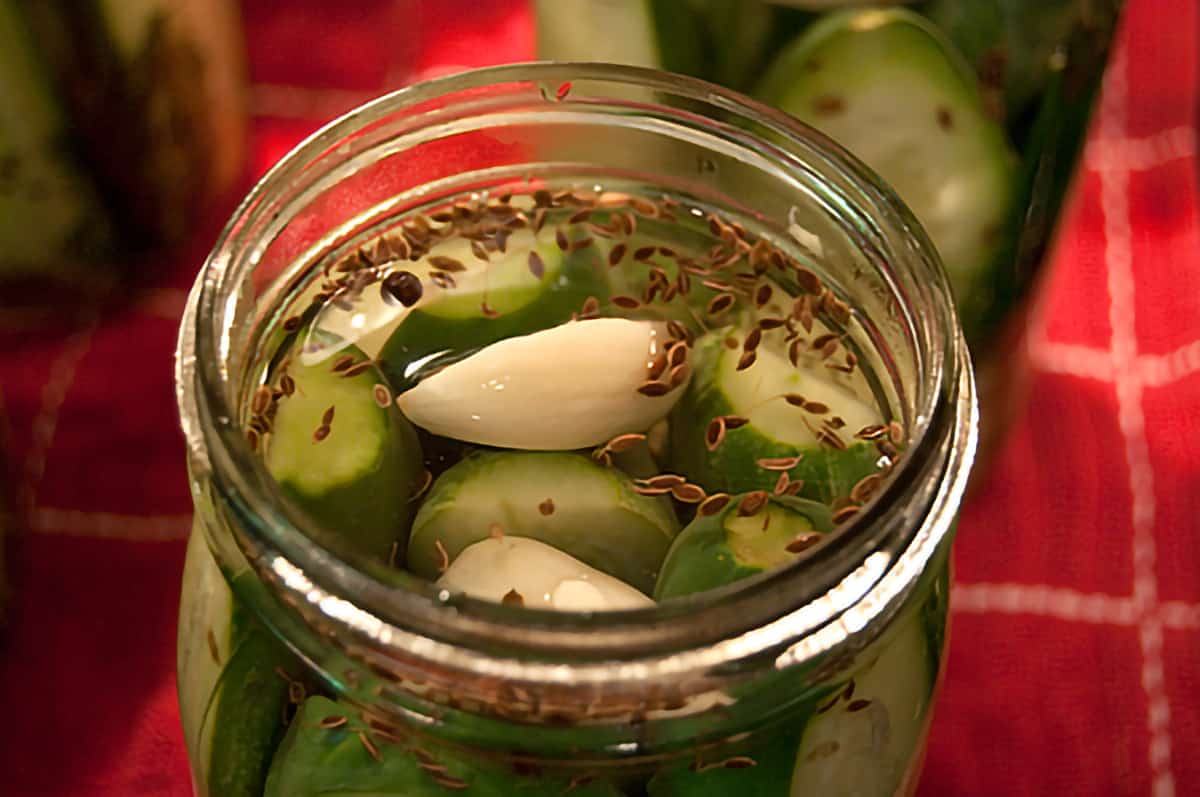
- I realized just as I was about to put the lids and rings on that I had not included the garlic in the jars. Yikes! Just goes to show you that with this recipe, it’s never too late to add an ingredient. You could even slip a hot red pepper in there at this point if you wanted to!
Clean the Jar Rims and Add the Lids

- Wipe the top rim of each jar carefully with a dampened paper towel. This is to make sure that there is nothing on there that would prevent the lid from forming a complete seal.
- Place the lids on top of the jars and screw on the rings (bands) until just finger tight.
Pro Tip
When applying the rings to the jars, don’t screw them down tight or force them. The jars must be able to expel air during the canning process in order to create a seal.
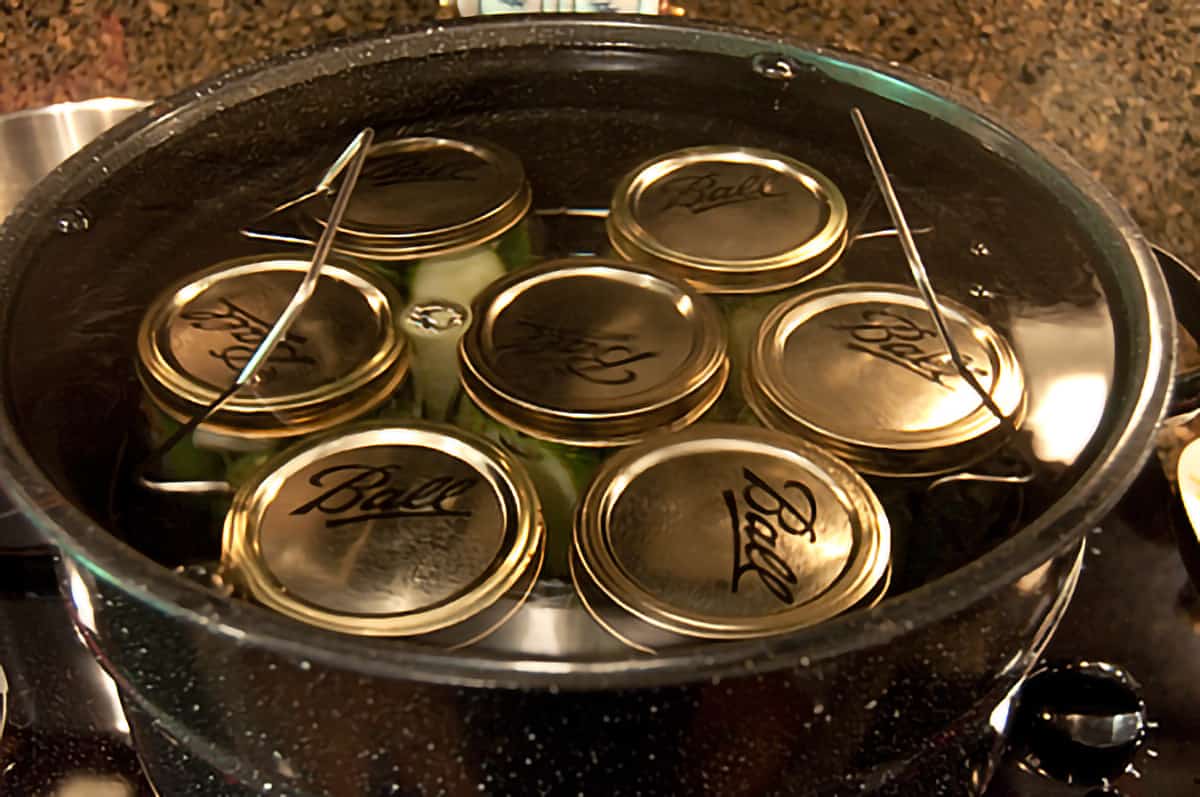
Process Using Low Temp Method
- Place the jars in the canner rack and lower them into the simmering hot water. There should be enough water to cover the tops of the jars by at least one inch.
- Place the cover on the pot. Bring the water up to between 180 and 185 degrees and process for 30 minutes (low temp pasteurization method).
Notes About Low Temp Pasteurization
I use the low temperature pasteurization method for these pickles. This method prevents overcooking the pickles and helps them to retain crispness during storage. The low temp method can only be used for high acid recipes and must be monitored carefully to make sure the water remains above 180 degrees for the entire processing time.
To use the low temp method, heat the water to a simmer while preparing the filled jars. Lower the jars into the simmering water and allow it to come up to between 180º and 185º F. Maintain the water temperature for 30 minutes. Check with a thermometer to be certain that the water temperature is at least 180ºF during the entire 30 minutes.
If the temperature of the water drops below 180 degrees during processing, bring the temperature back up to at least 180 degrees and start the timing over so that the jars have a full 30 minutes of processing at 180 degrees.
Note that there should be enough water in the canner to cover the tops of the jars by at least one inch. I keep a separate pot of simmering water on the stove in case I need more water in the canner when I add the jars.
Cool Jars and Test the Seal Before Storing
- At the end of the processing time, use a jar lifter to carefully remove the jars from the canner, place them on a clean dish towel, and allow them to cool completely (24 hours recommended).
- You will notice when you remove the jars from the canner that the cucumbers have become a more olive color, and there is undissolved salt in the bottom of the jar. That’s normal. By the time the jars have cooled overnight, all the salt should have dissolved. If the salt still hasn’t dissolved after sitting overnight, gently turn the jar over a couple of times to mix and disperse.
- After the jars are completely cooled, you may remove the ring bands. Be sure to test for a complete seal. Any jars that failed to seal are not shelf-stable but may be stored in the refrigerator.
How to Test For a Complete Seal
- How to test the seal? First, gently press the center of each lid. If there is any movement, then the jar did not seal. Next, gently pull upward, trying to lift the jar by the edges of the lid. If the lid pulls away, obviously it didn’t seal. The pickles are still good but can’t be stored outside of refrigeration.
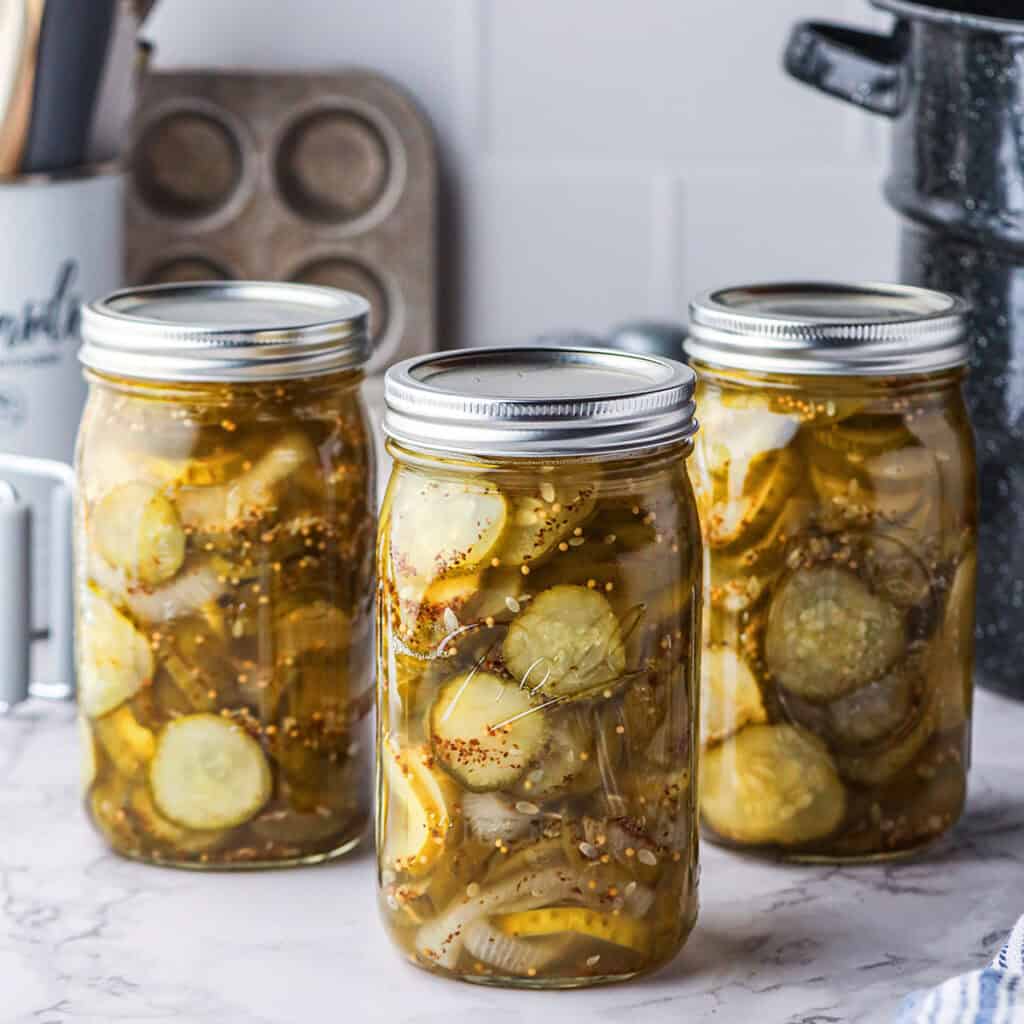
And just like that, you have seven beautiful jars of Favorite Kosher Dill Pickles!
Storage Instructions
- Store the jars in a dark, cool place such as a pantry or cellar. I recommend six weeks of standing time for the flavors to fully develop. For best quality, the pickles should be used within one year.

Have a question or thought to share?
If you have a question about the recipe or if you’ve made it and want to share how it turned out, I would truly enjoy hearing from you. Just scroll down to leave a comment or add your star rating.
Thank you for stopping by. It means a lot to have you here.
Recipe

Favorite Kosher Dill Pickles
Ingredients
- 7 cups water
- 7 cups white vinegar 5% acidity
- 7 tablespoons pickling salt
- 7 tablespoons dill seed or 21 heads fresh dill
- 42 black peppercorns
- 14 garlic cloves peeled and halved
- 35 cucumbers pickling type (estimate 5 cucumbers per quart (or 6 pounds to make the entire 7 quarts); more or less may be needed)
Instructions
- Prepare home canning jars and lids according to manufacturer’s directions.
- For each quart of pickles, bring 1 cup water and 1 cup vinegar to the boil.7 cups water, 7 cups white vinegar
- Meanwhile, in each jar place 1 tablespoon pickling salt, 1 tablespoon dill seed (or 3 heads fresh dill), 6 black peppercorns and 2 halved garlic cloves.7 tablespoons pickling salt, 7 tablespoons dill seed, 42 black peppercorns, 14 garlic cloves
- Pack halved or quartered cucumbers into jars. Pour boiling vinegar and water over cucumbers in jars. Affix the lids and rings.35 cucumbers
- Process in simmering hot water (180-185 degrees) for 30 minutes (low temp pasteurization method).
- Remove jars from canner and allow to cool completely (24 hours recommended). Remove bands and test for complete seal. Store in a dark, cool place.
- Recommend six weeks of standing time for flavors to fully develop.
Notes
- After the jars have cooled, be sure to test for a complete seal. See instructions in the post for testing the seal.
- After processing, the cucumbers will be a more olive color, and there may be undissolved salt in the bottom of the jar. That’s normal. When the jars have cooled, all the salt should be dissolved. If the salt still hasn’t dissolved after sitting overnight, gently turn the jar over a couple of times to mix and disperse.
- Store the jars in a dark, cool place.
- Allow six weeks of standing time for the flavors to fully develop.
- For best quality, the pickles should be used within one year.
Nutrition Information
Nutrition information is calculated by software based on the ingredients in each recipe. It is an estimate only and is provided for informational purposes. You should consult your healthcare provider or a registered dietitian if precise nutrition calculations are needed for health reasons.
The recipe was not enough brine for my quart sized jars
That would usually indicate that the jars were not packed with enough cucumbers and too much empty space was left for the brine to fill. I always have some brine left over.
Was having a bad day, still had pickles to can and thought I’d added everything to the jars until this morning!!! I have 8 quarts of pickles with NO added pickling salt…. For some strange reason, I did not add the salt. Are these pickles now trash or omitting the salt is no big deal?
The pickles are still safe to eat assuming you followed correct canning procedures. They certainly won’t taste the same. But, no, they’re not trash :-)
So glad to hear that!! I’ve canned a large amount of pickles from this recipe and followed the recipe exactly but had too much on my plate yesterday. Still waiting for the 6 weeks to enjoy them.
These are THE BEST pickles I’ve ever made. We’ve been searching for a recipe that tasted like my Nana’s and we’ve finally found it! They stay so crunchy and the flavor is incredible.
I’m so glad you like the pickles, Kayla! Our family does, too.
Hi. Can I use apple cider vinegar 5% instead of white vinegar? Thank you.
Hi Cristina. Yes, you can as long as it is at least 5% acidity. It will, however, change the taste and appearance of your pickles. They’ll have a “mellower” taste and the apple cider vinegar will probably darken the pickles as well.
Thank you for the answer. I have a couple more questions, if you can please help me.
I used the ratios in your recipe, but instead of white vinegar I used apple cider vinegar 5%, and also added 1/2 tablespoon of sugar per 1 cup of water and 1 cup of vinegar (used salt, too: 1 tablespoon pickling salt per 1 cup of water and 1 cup vinegar). Questions:
1) Is it ok to use sugar like I have written above?
2) When I added the brine ingredients in the pot on the stove to boil, I did not mix the ingredients (manually with a spoon). Does the boiling process mix the brine ingredients uniformly? I just want to make sure that everything got distributed uniformly in the brine so that in each jar there is a correct ratio of water/vinegar/salt/sugar.
Thank you.
Hi Cristina – First, yes, your ingredients are thoroughly mixed if they’ve dissolved and come to the boil.
Second, about the added sugar — I’d be wary of doing that unless I was going to store the product in the fridge (in which case the boiling water sealing process wouldn’t even be necessary). Home canning recipes have to be within a specific pH range in order to be shelf-stable and avoid the possibility of developing botulism. In this case, the vinegar to water ratio is likely high enough that the small amount of sugar you added wouldn’t affect the outcome very much, but I can’t possibly know that without lab testing. Also, the NCHP says “it is possible to affect the safety of a home-canned good by using too much sugar. Sugar is, after all, a carbohydrate, and carbs impact the density of foods. Extra sugar also slows down heat penetration.” Now, again, the amount of sugar you added is probably not enough to cause problems, but canning recipes are written very specifically for a reason. They absolutely have to be safe from a pH standpoint and correctly sealed in order to be stored outside of refrigeration.
If I’d made the pickles the way you describe, I’d store them in the refrigerator just to be certain of safety. I can’t imagine why you’d want to add sugar to dill pickles, anyway :-)
Thank you for the quick reply.
I added the sugar as a taste preference, and I did put the jars in the fridge after about 24 hrs after canning them. I also saw this recipe on the NCHFP website https://nchfp.uga.edu/how/can_06/quick_dill_pickles.html, and it uses sugar, but less vinegar than water. What do you think in terms of ph and safety, especially since I used more vinegar
If the recipe was on the NCHP website you can be absolutely sure that it has been tested and proven safe for home canning and pantry storage. They’re recognized nationwide as the highest authority in home canning.
My dad always added a pinch of alum. He said this kept the pickles crispy. Any thoughts?
According to the USDA’s latest research, alum may be used to firm fermented pickles, but has little crispness effect on quick-process pickles like these.
Hi! Quick question, did you reduce the amount of salt? I thought I remembered adding one tablespoon and one teaspoon of salt per quart jar in previous years, but i could be loding it. Love your pickle recipe, been using it for years!
Wow, you have a great eye Tave. Yes, you’re right. I did decrease the amount of salt after many people complained that the pickles were way too salty. I still use the original measurements when I make them, anyway.
Thank you!!
I am wanting to slice my cucumbers into bite size pieces. I usually use a mandolin and cut them about 1/4 inch or so. Would this recipe still work for this?
I’ve never made this recipe with slices, only with whole cucumbers, halves, or spears. However, I believe you probably could do slices.
I’m so ready to make my own dills at home – been buying them from the store for ages and I think that I would save so much money if I just made them on my own. Thank you for your guidance and recipe – can’t wait to try it!
Thanks for this recipe. I thought I bought three Japanese cucumber plants, but actually bought three containers with three plants in each! Needless to say, I’ve got bags full.
Surprising it took me a lot of searching to find your recipe, which didn’t use sugar. All the recipes I found before yours all had cups of it.
My only question: other recipes I saw had higher ratios of vinegar to water. In a 1:1 ratio, doesn’t the acidity of the vinegar get compromised?
Thanks for your time.
Thanks for asking, Kelley. The ratio of water to vinegar is 1:1 which is standard for most dill pickle recipes. That ratio will maintain the necessary acidity for shelf-stable pickles so long as the processing instructions are followed correctly.
Lana,
Just wanted to say thanks. This is the third year we are coming back to your recipe for “our” dill pickle recipe. They are fantastic every time. Thanks!
I’m so glad to know that you enjoy this recipe! It has been my go-to for years. I have the dill growing for it in the garden already :-)
These just came out of the canner:) they sure look nice!!! I am very excited to see how they turn out!!! (In 6 weeks)
These pickles have been a hit in my house! We’ve made them twice this summer. My husband woke me up one night to tell me how good they were, ha! Thanks for this recipe!
I’m so pleased that you and your family are enjoying them!
I am so happy that I found your website. I have been using your receipt ever since last year. Those pickles are “THE BOMB.” I really enjoy making them and I can’t keep enough of them on hand between friends and family. Looks like I will be growing pickles year. THANKS!
hi, im so happy i found your sight! this is our first year doing a garden, and im starting to harvest some of our veggies now…we have alot of pickling cucumber and english cuc’s that we planted…my daughter and i have just finished our official first batch of pickles! can hardly wait to see how they taste! i so love the “sour” type of pickles and im hopefull this recipe will do it…thanks so much
These look beautiful! Do you use white vinegar or apple cider-or does it matter?