

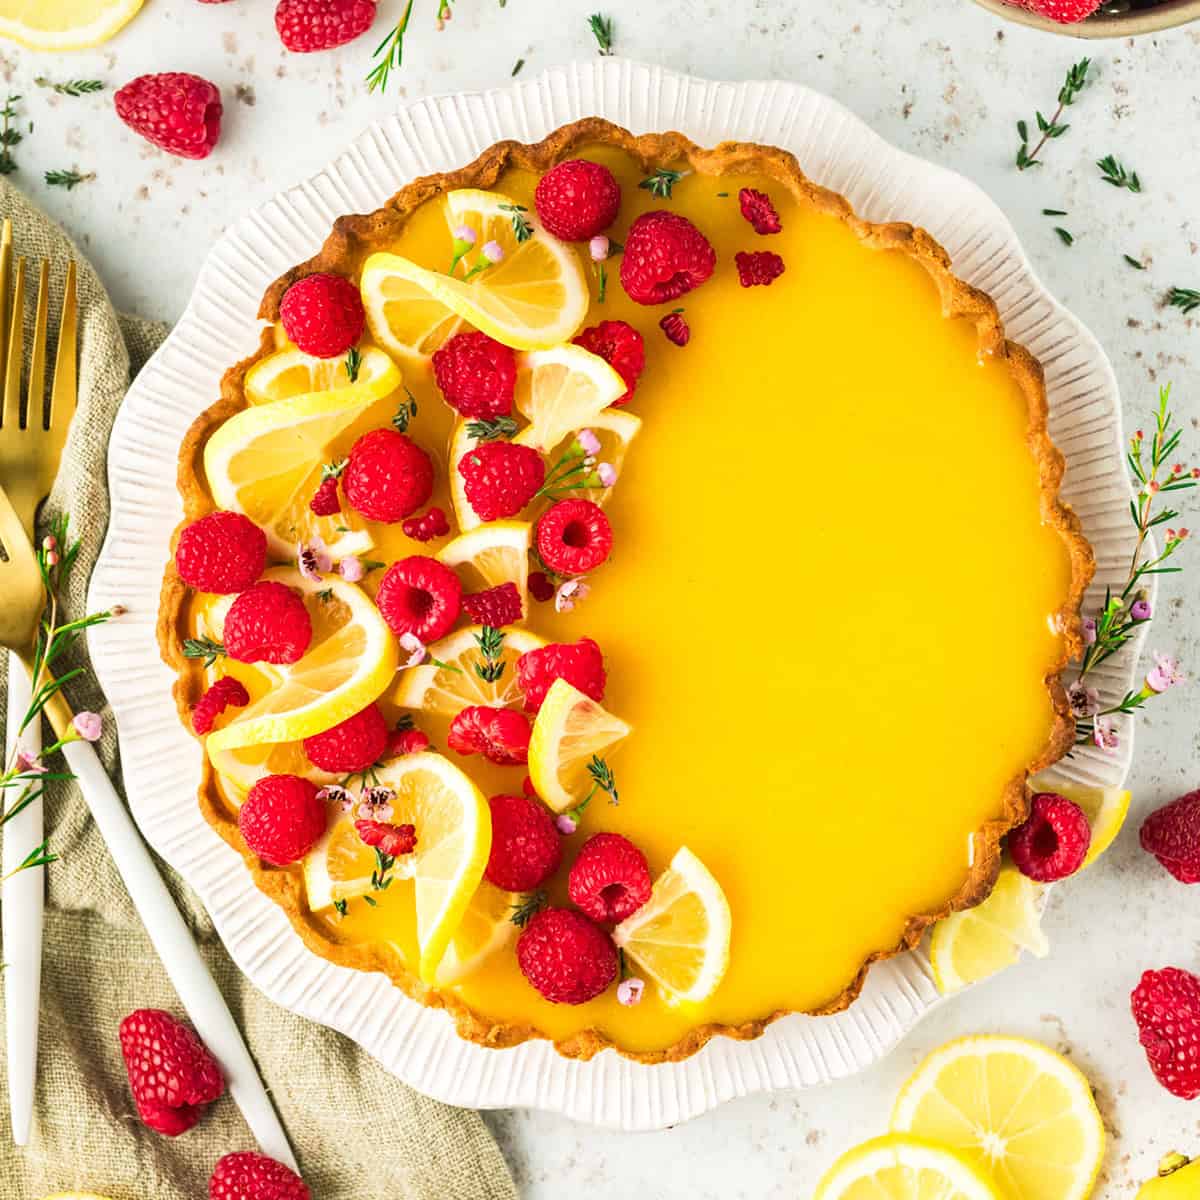
Your friends and family are sure to be impressed when you serve this beautiful, mouth-watering Lemon Raspberry Tart recipe. This dessert not only looks impressive, it’s also totally delicious!
My Lemon Raspberry Tart is a beautiful option for dessert that combines a tangy lemon curd filling with a layer of raspberry jam, all encased in a slightly sweet, buttery shortbread crust. This gorgeous dessert just screams spring!
And while it’s really tempting to simply purchase a pre-made tart shell, making a homemade one from scratch is always special. It’s easier than you think. Even I, who can’t make a pie crust to save my life, can easily manage this shortbread-style crust.
Recipe Snapshot: Lemon Raspberry Tart
Prep Time: 1 hour
Cook Time: 4 minutes
Chill Time: 2 hours
Total Time: 3 hours, 40 minutes
Servings: 8
Cuisine: American
Cooking Method: Oven/Stovetop
Primary Ingredients: Lemons, eggs, sugar, raspberry jam, sugar, flour, sugar
Skill Level: Moderate
DO MORE WITH CHATGPT
WHAT PEOPLE ARE SAYING …
⭐⭐⭐⭐⭐
“This was so delicious, my family can’t wait for me to make it again!”
— Kristin
“I tried this recipe, and it was delicious. The flavors were perfectly balanced!”
— Shiela
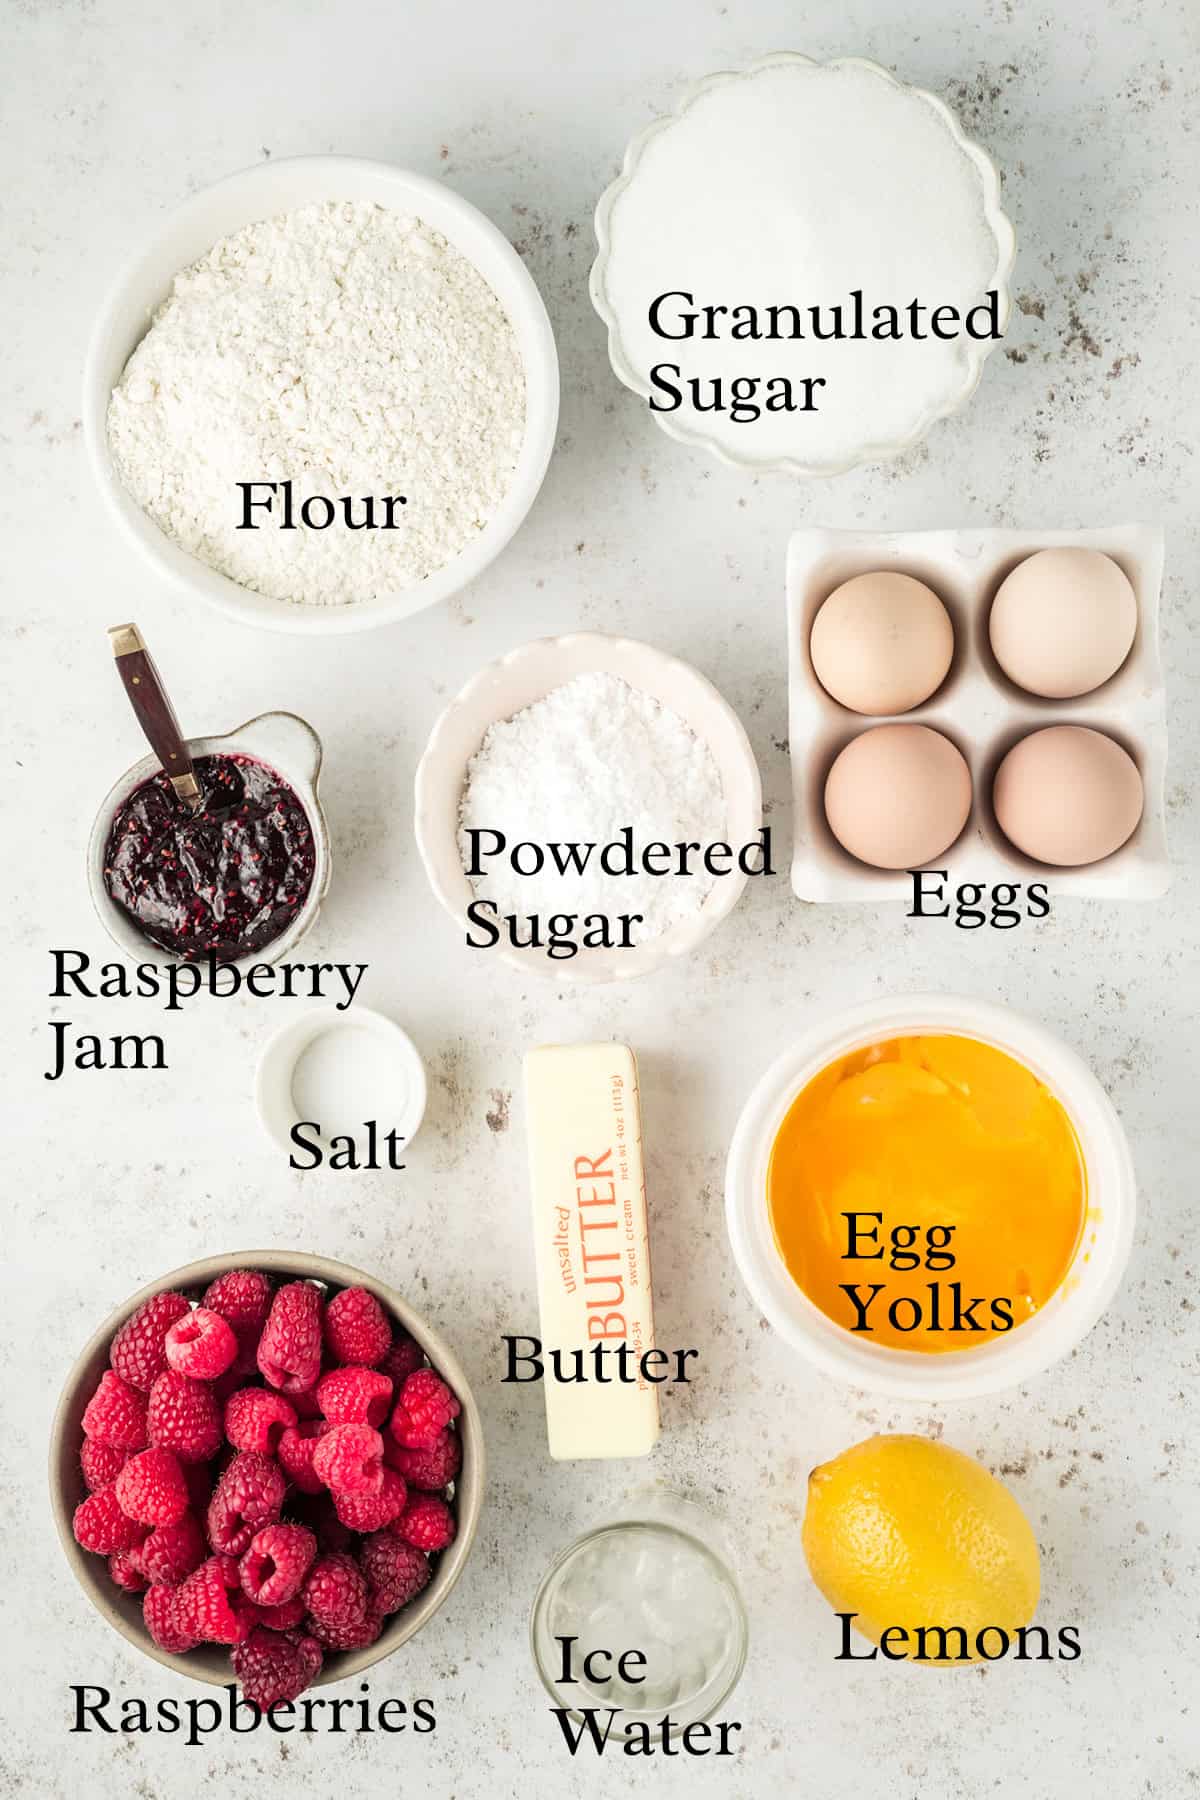
Ingredient Notes
This post may contain affiliate links. Lana’s Cooking is reader-supported and earns a tiny commission at no extra cost to you when you shop from our links.
- All-purpose flour – It’s the main ingredient in the buttery crust. I always recommend my favorite flour, White Lily, which is a Southern flour that’s soft and perfect for baked goods.
- Powdered sugar – For a little sweetness in the crust. Domino’s always works great for me.
- Granulated sugar – Used in the lemon curd filling.
- Eggs – Needed for both the crust and filling.
- Butter (unsalted) – Helps create that tender, flaky crust that just melts in your mouth.
- Lemons – Well, of course! Not only are lemons the main flavoring ingredient for the filling, I also use a bit in the crust for maximum citrus impact.
- Raspberry jam – A thin layer of raspberry jam spread over the bottom of the tart crust adds an extra dimension of flavor. Choose a quality brand like Bonne Maman for the best, brightest flavor.
- Optional garnishes – The garnishes are optional, but in my opinion, they really make this dessert special! I like to use fresh raspberries, lemon slices, whipped cream, fresh thyme sprigs, and/or edible flowers. If you have blooming thyme in your garden, the tiny flowers are just lovely on this tart.
The complete ingredient list with detailed measurements is included in the printable recipe card at the bottom of this post.
How to Make Lemon Raspberry Tart
Mix and Bake the Shortbread Crust

STEP 1. In a large bowl, combine the flour, powdered sugar, lemon zest, and salt. Toss together until evenly combined, making certain that the lemon zest is well coated with the flour.
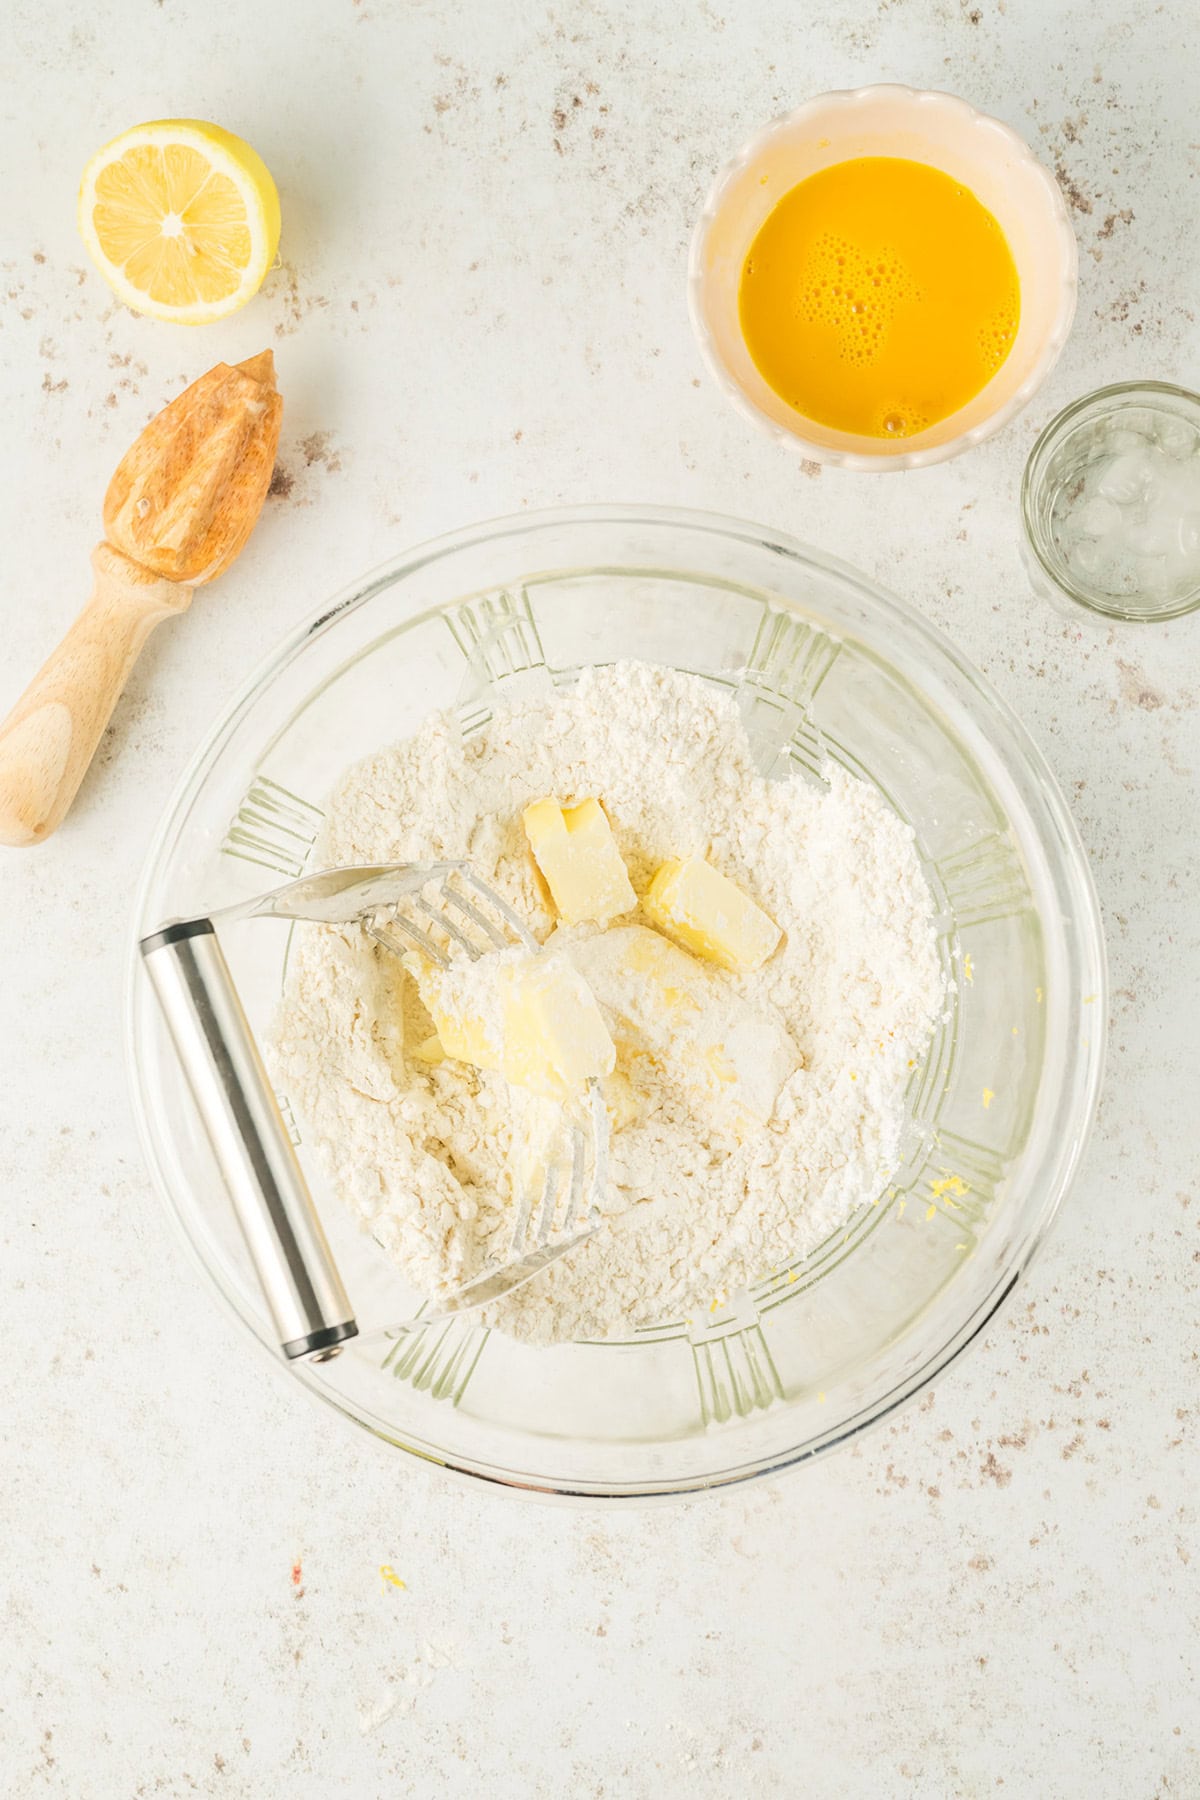
STEP 2. Using a pastry cutter or a fork, blend the butter into the flour until it resembles coarse sand. Stir in the egg yolk and lemon juice.

STEP 3. Gather the dough together into a ball. If necessary, add a teaspoon of water at a time until the dough comes together.
STEP 4. Wrap the dough in plastic wrap and refrigerate for 15 minutes.
STEP 5. Heat the oven to 375° and lightly spray a removable-bottom 9-inch tart pan with cooking spray.

STEP 6. Remove the dough from the refrigerator. Use a rolling pin to roll it out on a lightly floured surface to a 1/4-inch thick circle.

STEP 7. Gently lift the dough and transfer it to the tart pan. Gently press the dough into the pan. Trim off any excess dough that extends above the top edge of the pan. Use a fork to lightly prick the crust all over.

STEP 8. Cut a piece of parchment paper to fit inside the tart pan, covering the bottom and up the sides. Crumple the paper (to make it pliable), smooth it out, and place it in the pan, covering the dough. Add 2 cups of pie weights, dry beans, or rice on top of the parchment paper.

Pro Tip
You may find it easier to simply press the dough into the pan instead of rolling it out. Place the ball of chilled dough in the prepared pan and gently press until the dough is distributed over the bottom and up the sides of the pan. Work quickly so the butter doesn’t melt.
STEP 9. Bake the crust with the weights in place for 20 minutes.
STEP 10. Remove from the oven and cool for 20 minutes, then remove the parchment paper and weights.
Want to save this?
Make the Filling and Assemble the Tart

STEP 11. Place the sugar, lemon juice, eggs, egg yolks, zest, and salt in a medium saucepan.

STEP 12. Cook over medium heat, whisking continually to prevent the eggs from curdling.

STEP 13. When the curd has thickened, remove it from the heat. Stir in the butter until it melts and the mixture is smooth.
Pro Tip
How do you know when the lemon curd is thick enough? The curd should coat the back of a spoon; if you run your finger through the curd on the spoon, it should leave a clean line in the curd.

STEP 14. Pour the curd through a fine-meshed strainer and let it cool for 15 minutes. While the filling cools, preheat the oven to 350° and set the tart pan with the cooled shell on a baking sheet.

STEP 15. Spread the raspberry jam over the bottom of the cooled crust.

STEP 16. Pour the cooled curd over the layer of raspberry jam.
STEP 17. Transfer the baking sheet to the oven and cook the tart for 10 minutes or until the edges of the crust are set.
STEP 18. Remove and set on a wire rack to cool completely. Refrigerate for 2 hours before serving.

Troubleshooting Tips
- Preventing Soggy Crust: If you want to be extra sure that the tart crust stays crisp, try brushing the bottom with a very thin layer of beaten egg before baking. This creates a moisture barrier between the crust and filling.
- Don’t Overbake: Check the tart every few minutes while it’s baking. If the edges of the crust seem to be browning too quickly, cover them loosely with aluminum foil.
- Thickening the Lemon Curd: If the lemon curd doesn’t seem to be thickening properly, increase the heat very slightly and continue whisking until it reaches the correct consistency. But be careful not to let it boil, as that can make the eggs curdle.
- Fixing a Curdled Lemon Curd: If the curd does start to curdle, don’t panic! Remove it from the heat immediately, and strain it through a fine-mesh sieve to remove the lumps. Then add a tablespoon of cold water and whisk vigorously to smooth out the texture.
How to Store the Tart
- I store this dessert in a container with an airtight seal in the refrigerator for up to 5 days.
- To freeze, I recommend slicing it into individual portions, wrapping each in plastic followed by aluminum foil, and storing it in the freezer for up to 3 months. To serve, thaw overnight in the refrigerator and let it sit at room temperature for 30 minutes before enjoying it again.

Questions and Answers: Lemon Raspberry Tart
- Can I use purchased lemon curd in lemon raspberry tart instead of making it from scratch?
The short answer is “yes, of course.” But while it’s possible to use store-bought lemon curd as a shortcut, nothing beats the fresh taste of homemade. - Can I make the crust gluten-free?
Yes, you can substitute gluten-free flour for the all-purpose flour. Adjust the amount of liquid as needed to achieve the right consistency. - Can I omit the raspberry jam layer in lemon raspberry tart?
While the raspberry jam does add another layer of flavor to the tart, you can omit it if you like or substitute another preserve of your choice. Both strawberry and blackberry jam are fantastic with this filling. - My lemon curd turned out too runny. What did I do wrong?
If your lemon curd is too runny, it may not have been cooked long enough to thicken properly. Make sure to cook the curd over medium heat until it coats the back of a spoon and holds a clean line when you run your finger through it. - Can I make a lemon raspberry tart without a tart pan?
I’d always recommend using a tart pan for the best results, but you can also use a regular 9-inch pie dish or cake pan if the tart pan isn’t an option. Press the dough into the bottom and up the sides of the pan, then proceed with the recipe as directed.
More Recipes You’ll Like


Have a question or thought to share?
If you have a question about the recipe or if you’ve made it and want to share how it turned out, I would truly enjoy hearing from you. Just scroll down to leave a comment or add your star rating.
Thank you for stopping by. It means a lot to have you here.
Recipe

Lemon and Raspberry Tart
Ingredients
For the Crust:
- 1 ¼ cups all-purpose flour
- ½ cup powdered sugar
- 1 tablespoon lemon zest
- ¼ teaspoon salt
- 8 tablespoons unsalted butter cold, cut into cubes
- 1 egg yolk room temperature
- 1 teaspoon lemon juice
- 2 tablespoons ice water optional
For the Filling:
- 5 tablespoons raspberry jam
- 1 cup granulated sugar
- 1 cup fresh lemon juice
- 4 large eggs
- 4 large egg yolks
- 1 tablespoon lemon zest
- ¼ teaspoon salt
- ¾ cup unsalted butter cut into tablespoons
Optional Garnishes:
- Fresh raspberries, lemon slices, whipped cream, fresh thyme and/or edible flowers
Instructions
Mix and Bake the Crust:
- In a large bowl, combine the flour, powdered sugar, lemon zest, and salt. Toss together until evenly combined, making certain that the lemon zest is well coated with the flour.1 ¼ cups all-purpose flour, ½ cup powdered sugar, 1 tablespoon lemon zest, ¼ teaspoon salt
- Using a pastry cutter or a fork, blend the butter into the flour until it resembles coarse sand. Stir in the egg yolk and lemon juice.8 tablespoons unsalted butter, 1 egg yolk, 1 teaspoon lemon juice, 2 tablespoons ice water
- Gather the dough together into a ball. If necessary, add a teaspoon of water at a time until the dough comes together.
- Wrap the dough in plastic wrap and refrigerate for 15 minutes.
- Heat the oven to 375° and lightly spray a 9-inch tart pan with cooking spray.
- Remove the dough from the refrigerator and roll it out on a lightly floured surface to a 1/4-inch thick circle.
- Gently lift the dough and transfer it to the tart pan. Gently press the dough into the pan. Trim off any excess dough that extends above the top edge of the pan. Use a fork to lightly prick the crust all over. Note: You may find it easier to simply press the dough into the pan instead of rolling it out. Place the ball of chilled dough in the prepared pan and gently press until the dough is distributed over the bottom and up the sides of the pan. Work quickly so the butter doesn’t melt.
- Cut a piece of parchment paper to fit inside the tart pan covering the bottom and up the sides. Crumple the paper (to make it pliable) then smooth it out and place it in the pan covering the dough. Add 2 cups of pie weights, dry beans, or rice on top of the parchment paper.
- Bake the crust with the weights in place for 20 minutes.
- Remove from the oven and cool for 20 minutes, then remove the parchment paper and weights.
Make the Filling and Assemble the Tart:
- Place the sugar, lemon juice, eggs, egg yolks, zest, and salt in a medium saucepan.1 cup granulated sugar, 1 cup fresh lemon juice, 4 large eggs, 4 large egg yolks, 1 tablespoon lemon zest, ¼ teaspoon salt
- Cook over medium heat, whisking continually to prevent the eggs from curdling.
- When the curd has thickened, remove it from the heat. Stir in the butter until it melts and the mixture is smooth.Note: When thickened sufficiently, the curd should coat the back of a spoon; if you run your finger through the curd on the spoon, it should leave a clean line in the curd.¾ cup unsalted butter
- Pour the curd through a fine-meshed strainer and let it cool for 15 minutes. While the filling cools, preheat the oven to 350° and set the tart pan with the cooled shell on a baking sheet.
- Spread the raspberry jam over the bottom of the cooled crust.5 tablespoons raspberry jam
- Pour the cooled curd over the layer of raspberry jam.
- Transfer the baking sheet to the oven and cook the tart for 10 minutes or until the edges of the crust are set.
- Remove and set on a wire rack to cool completely. Refrigerate for 2 hours before serving.
Nutrition Information
Nutrition information is calculated by software based on the ingredients in each recipe. It is an estimate only and is provided for informational purposes. You should consult your healthcare provider or a registered dietitian if precise nutrition calculations are needed for health reasons.
So so good! Definitely making this again!
I tried this recipe and it was delicious. The flavors were perfectly balanced!
Tangy, sweet, and perfect for summer!
This was delicious!
This was so delicious, my family can’t wait for me to make it again!