


If any recipe can bring a crowd to the kitchen in seconds, it’s these Loaded French Fries. Crispy oven-baked fries with gooey melted cheese, smoky bacon, and all the toppings you love. This is the kind of food that disappears fast and leaves people wanting more.
Loaded French Fries is one of those recipes that delivers big flavor with minimal effort. You start with frozen fries, which is already half the work done for you, and then layer on cheese, bacon, and all the other toppings that just make people smile. It’s simple, satisfying, and always disappears fast!
What I like most about this recipe is how it takes ordinary, everyday frozen French fries and transforms them into something over-the-top. Yet, there’s nothing at all complicated or fancy about it. It’s just that ooey-gooey mouth-watering appeal of melted cheese combined with irresistible crispy fries. That’s the kind of upgrade that makes you wonder why you don’t enjoy this more often.
When you get right down to it, this is pure and simple comfort food, with great ingredients and easy techniques. Sometimes that’s just what you need.
Recipe Snapshot
Cuisine: American
Cooking Method: Oven
Total Time: 45 Minutes
Servings: 4
Primary Ingredient(s): Frozen French fries, cheddar cheese, Colby Jack cheese, bacon, sour cream, green onions
Skill Level: Easy
What You’ll Like About This Recipe
- You can make it your own. The base stays the same, but you can top it with whatever your family loves or whatever you have on hand.
- You get near restaurant-quality results at home. All that indulgent, satisfying flavor without leaving the house or spending a fortune!
Ingredient Notes

This post may contain affiliate links. Lana’s Cooking is reader-supported and earns a tiny commission at no extra cost to you when you shop from our links.
- Frozen French fries — You can use any style of fries that you like. Steak fries are thick-cut and sturdy enough to hold up under the toppings without getting soggy. Ore-Ida brand steak fries always work well for me.
- Cheddar and Colby Jack cheeses — This combination gives you the best of both worlds. You get the sharpness of cheddar and the creamy melt of Colby Jack. I prefer to use blocks and shred my own because the pre-shredded cheese is coated with anti-caking agents that make it melt unevenly. I think freshly shredded melts better and tastes better, too.
- Bacon — If you happen to have leftover bacon from breakfast, it’s perfect for this! Otherwise, I’d use pre-cooked Smithfield bacon or real bacon bits if you prefer. Just make sure it’s nice and crispy.
- Sour cream and green onions — The finishing touches that take loaded fries from good to great. The cool, tangy sour cream balances all the rich cheese and bacon, while the green onions add a little fresh taste and color. Both are optional, but I think they’re what take these fries from good to sensational!
The complete ingredient list with detailed measurements is included in the printable recipe card at the bottom of this post.
How to Make Loaded French Fries
- Preheat the oven according to whatever the package instructions say for the fries.


- While the oven heats, spread the frozen fries in a single layer on a baking sheet. Season lightly with salt and pepper.
- When the oven has come up to temperature, bake the fries until they’re crispy and golden, usually about 20-25 minutes.
👉 PRO TIP: I often cook the fries 2 to 3 minutes longer than the package instructions because I like them extra crispy. It helps them stand up to the toppings better.


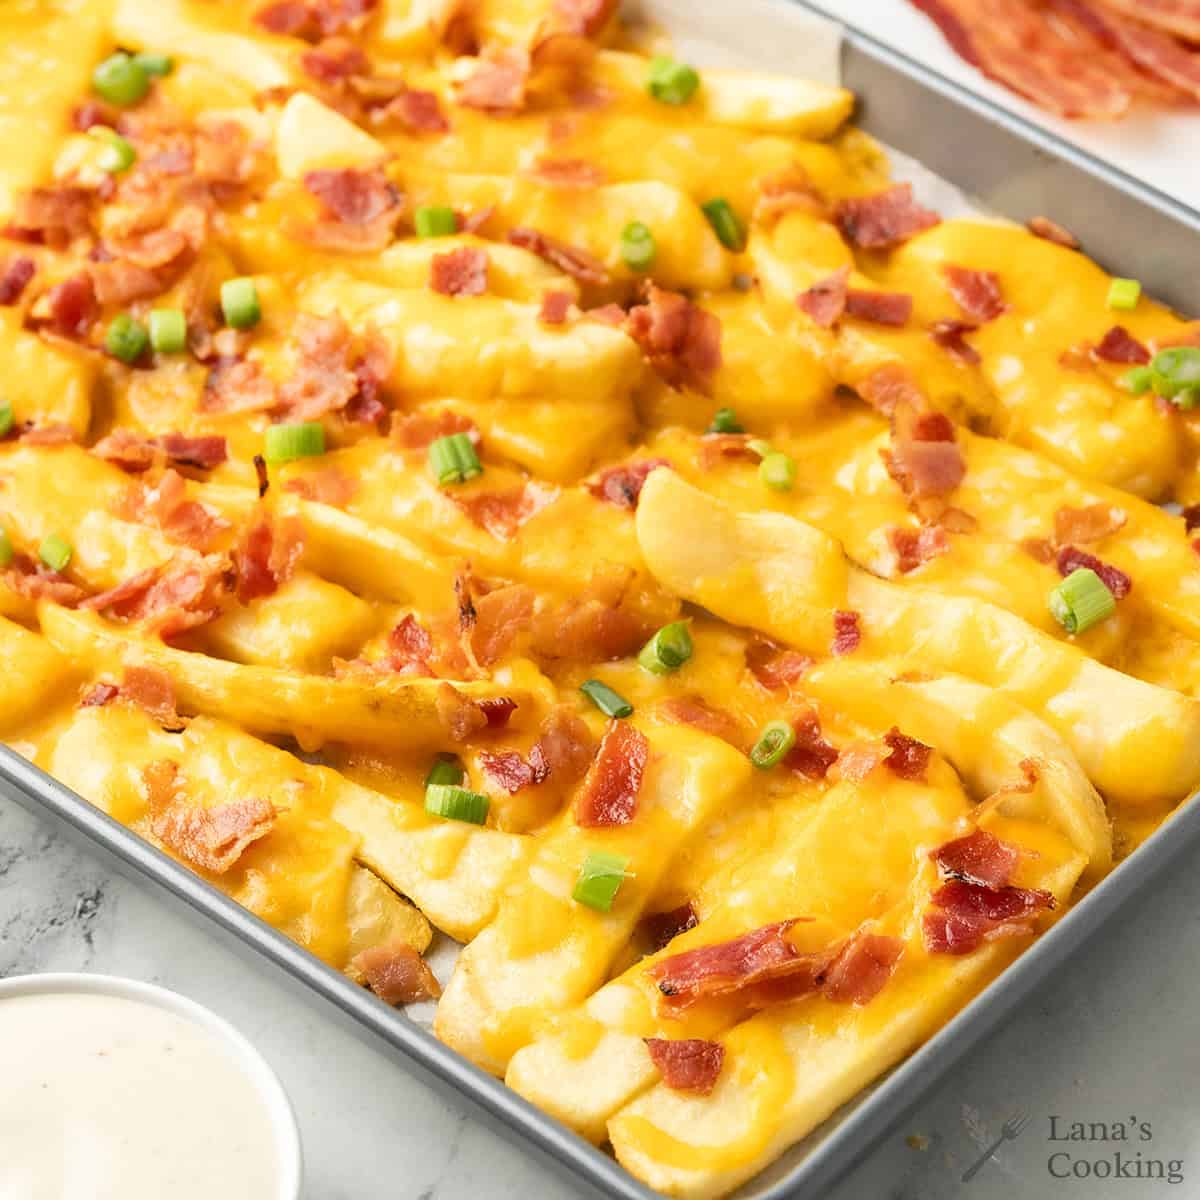
- Remove the fries from the oven and immediately sprinkle them with both the cheddar and Colby Jack cheese, making sure every fry is covered. Then, scatter the bacon pieces right over the cheese.
👉 PRO TIP: The heat from the fries starts melting the cheese immediately, so putting the bacon on top of the cheese keeps it crispy instead of it being buried under all that melted goodness.
Want to save this?


- Put the pan back into the oven for about 5 minutes, just until the cheese is completely melted and bubbly. Do watch it closely because every oven is different, and you can go from perfectly melted to overdone cheese in the blink of an eye.
- Remove from the oven and add the finishing touches of sour cream and a sprinkle of fresh green onions. Serve with your favorite dipping sauces such as Ranch dressing, blue cheese dip, or comeback sauce.
- The finished fries are meant to be enjoyed right away, while the cheese is still gooey and the fries are at their crispiest. We don’t let them sit around because loaded fries just won’t wait for anyone, and they’re at their absolute best when they’re still hot and fresh from the oven.

Troubleshooting Tips
- The cheese isn’t melting evenly. This can happen if the fries aren’t hot enough when adding the cheese, or especially when using pre-shredded cheese (the coating makes it difficult for pre-shredded cheese to melt correctly). Make sure the fries are steaming hot and give it a few more minutes in the oven.
- The fries are getting soggy. This usually means the fries weren’t cooked enough before adding the toppings. Don’t be afraid to bake them a few minutes longer than the package instructions suggest, as they need to be completely cooked through before adding any toppings.
Storage & Reheating
While these fries are at their best when served and enjoyed straight from the oven, if you want to keep the leftovers, here’s what you can do.
- Store leftovers in the refrigerator for up to 3 days in an airtight container. For best results, reheat in a 350°F oven for 8-10 minutes. The fries won’t be as crispy as they were when fresh, but they’ll still be delicious. Microwave reheating isn’t recommended. It makes the fries soggy, and nobody wants that.
Recipe Options
- Use different kinds of fries. You can use any frozen fries, such as crinkle cut, waffle fries, regular cut, or even tater tots. Just adjust the cooking time according to the package directions.
- Change up the cheese. Mix and match any good melting cheese you have in the refrigerator. Monterey Jack, pepper jack, or mozzarella all work fine.
- Change out the meat. Try cooked, crumbled sausage, diced ham, or even pulled pork. Cooked ground beef seasoned with taco seasoning turns these into nacho-style fries.
- More toppings! This is where you can really make the recipe your own. Diced jalapeños, sliced black olives, chopped tomatoes, and diced onions are all great. Ranch dressing, hot sauce, or a drizzle of barbecue sauce can take these fries in a different direction.
- Game Day Loaded Fries. Add seasoned ground beef and serve with multiple dipping sauces.
- Breakfast Style Loaded Fries. Top with scrambled eggs and breakfast sausage for a hearty morning treat.
- BBQ Pulled Pork Fries. Top with pulled pork and a drizzle of BBQ sauce for a Southern-inspired version.
- Buffalo Chicken Fries. Add buffalo chicken, then drizzle with buffalo sauce and add blue cheese crumbles.
- Lighten it up. Use turkey bacon instead of regular bacon, try reduced-fat cheese, or light sour cream. You can also add more fresh toppings like diced tomato or shredded lettuce.
How to Serve Loaded French Fries
These loaded cheese fries adapt to almost any kind of meal you’re planning. For weeknight dinners, they’re great alongside grilled burgers or barbecue chicken, especially with a simple side salad to cut through all the rich cheese.
On Game Days, try them with chicken wings, sliders, or a big bowl of chili. When you want something more substantial, serve them with grilled steak or barbecue ribs, where they’ll work like a loaded baked potato substitute.
They also make an excellent snack for movie or game nights.


Questions About Loaded French Fries
To be honest, these are best eaten straight from the oven. However, you can try reheating the leftovers in a 350°F oven for about 10 minutes. The fries won’t be as crispy as they were originally, but they’ll still taste good.
I don’t recommend making the full recipe ahead since loaded fries are best when they’re hot and fresh. However, you can definitely prep some of the components in advance. Cook the bacon and store it in the refrigerator, and shred the cheese ahead of time. When you’re ready to serve, just bake the fries and continue with the recipe.

Have a question or thought to share?
If you have a question about the recipe or if you’ve made it and want to share how it turned out, I would truly enjoy hearing from you. Just scroll down to leave a comment or add your star rating.
Thank you for stopping by. It means a lot to have you here.
Recipe

Loaded French Fries
Ingredients
- 16 ounces frozen French fries (recommend: Ore-Ida steak fries)
- salt and pepper to taste
- 3/4 cup shredded cheddar cheese
- 1/2 cup shredded Colby Jack cheese
- 5 slices cooked bacon crumbled (about 1/2 cup of crumbles)
Toppings and Garnishes:
- 1/2 cup sour cream
- 1/4 cup diced green onion
- Ranch dressing, blue cheese dressing, comeback sauce or other sauces for dipping
Instructions
- Preheat the oven according to the package instructions for the fries.
- Spread the fries evenly on a baking sheet. Sprinkle lightly with salt and pepper.16 ounces frozen French fries, salt and pepper
- Place in the oven and bake until crispy golden, approximately 20-25 minutes.
- Remove the fries from the oven and sprinkle the shredded cheeses evenly over the top. Scatter the crumbled bacon over the cheese.3/4 cup shredded cheddar cheese, 1/2 cup shredded Colby Jack cheese, 5 slices cooked bacon
- Return the fries to the oven for an additional 5 minutes, or until the cheese is fully melted.
- Transfer the loaded fries to a serving platter. Add optional toppings like sour cream and green onions or chives if desired.1/2 cup sour cream, 1/4 cup diced green onion
- Serve immediately with your choice of dipping sauces.Ranch dressing, blue cheese dressing, comeback sauce or other sauces for dipping
Notes
- These fries are best eaten fresh and hot from the oven. Leftovers can be stored in the fridge for a few days and reheated in a 350°F oven for about 10 minutes. They won’t be crispy, but they’ll still taste good.
Nutrition Information
Nutrition information is calculated by software based on the ingredients in each recipe. It is an estimate only and is provided for informational purposes. You should consult your healthcare provider or a registered dietitian if precise nutrition calculations are needed for health reasons.